Role Based Access Control
Starting with version 6 access to your resources is controlled by Role Based Access Control (RBAC).
Every identity wishing to create/read/update/delete any resource must have the correct privileges.
It is possible for authenticated users to infer names of resources to which they are not authorized. Avoid personally identifiable information or other high-risk data in names.
Best practice is the principle of least privilege. We recommend to only grant identities the privileges absolutely necessary to their purpose.
To quickly get started using roles head over to the Bundle list and download the Default roles bundle.
Can't see the video? Watch it on YouTube
Identities, Roles and Permissions
Identities can have one or more roles. Every role has a collection of permissions. Other than users there are also webhooks or the git integration, for a full list of identities please refer to the flow API overview.
To assign a role to a user, the user has to be created. For more on how to create and manage users refer to User & Role Management.
A permission for a role consists of three basic attributes which define its scope:
- project: Any of your projects
- Table type: Any cloudomation resource
- operation:
CREATE/READ/UPDATE/DELETE
All of these can be left unassigned, which means that they won't restrict access based on them.
A permission also has an effect — whether it grants or revokes access within that scope. See Allow and deny permissions.
To restrict access to only one project a permission could be created with only the project set and all other attributes left unset. This way all operations on all resources are allowed for the specific project.
Similarly if a permission is created with only the DELETE operation set it would allow deleting
of every record in all projects.
You can see which roles have access to a specific record, by navigating to the record in the UI and clicking on the access list icon.

Click on the access list icon to see what roles have access to a record
All identities have implicit permissions to read and write the own record. For example, a user can read and update the own user record without the need for an explicit permission to do so.
It is not possible to modify the organization admin role to prevent you from locking yourself out
of the system.
The built-in organization admin role has one permission entry, where every attribute is left unset.
Allow and deny permissions
Each permission carries an effect, either allow or deny:
- Allow (the default) grants the scoped operation.
- Deny revokes the scoped operation.
A deny takes precedence over an allow. Across all of an identity's roles, effective access to an operation on a record requires at least one matching allow and no matching deny for that scope. A permission created without an explicit effect is an allow, so a role built entirely from allow permissions is a pure grant list.
Deny permissions express an exception to a broad grant without enumerating
every case the grant should still cover. For example, a role can allow READ on
all custom objects in a project and deny READ on custom objects of a single
object template — the role then reads
every kind of custom object except that one.
A deny is matched at the same granularity as an allow: project, record type, operation, and — for custom objects — object template. A deny also overrides access that reaches a record through its bundle: a deny on a record type applies even where a bundle permission would otherwise allow the operation.
A deny is not bypassable by adding another allow. To restore access, remove or narrow the deny rather than adding a broader allow.
The implicit permission every identity has to read and update its own record, and the internal access used by the engine, git integration and other internal processes, are unaffected by deny permissions.
User interface
When you add or edit a role permission, the Effect field selects allow or deny. Deny permissions are flagged in the permissions list so a revoking permission is easy to spot.
Flow API
add_role_permission accepts an effect argument ('ALLOW' or 'DENY'), which
defaults to 'ALLOW'.
import flow_api

def handler(system: flow_api.System, this: flow_api.Execution, inputs: dict):
    role = system.role('support').save()

    # allow reading every custom object in all projects
    role.add_role_permission(table_type='CUSTOM_OBJECT', operation='READ')

    # ...except custom objects of the `secret-note` object template
    secret_note = system.object_template('secret-note')
    role.add_role_permission(
        table_type='CUSTOM_OBJECT',
        object_template_id=secret_note.get('id'),
        operation='READ',
        effect='DENY',
    )
    return this.success('role with an exception created')
Creating Roles
There are a few ways to create roles and assign permissions to them:
User Interface
To create a role click on the top right of the user interface and choose Manage Users & Roles,
in the Roles tab click on the button Add role. After the role has been created it can be
given permissions by clicking the Add button in the permissions section.
Flow API
To create a role via the flow API the method System.role can be used
role = System.role('my-new-role').save()
Adding permissions to this role is done by calling role.add_role_permission
# my-new-role allows reading of files in every project
role.add_role_permission(project_id=None, table_type='FILE', operation='READ')
# view all permissions of my-new-role
this.log(permissions=role.role_permission_list(fields=['table_type', 'operation', 'project_id']))
Assigning roles to identities
roles can be given to identities by three means:
User Interface
From the identity view
By clicking on the role-management button in the top right corner of an identity.
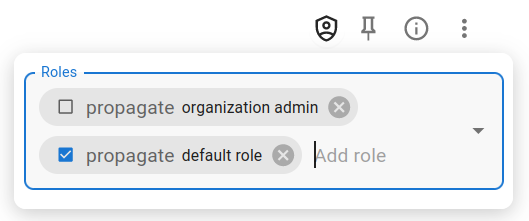
Add a role to an identity from the identity view
There is a checkbox propagate more on this later.
From the role view
Still in the user interface, you can navigate to a role. Click on "+ Add" to assign it to identities.
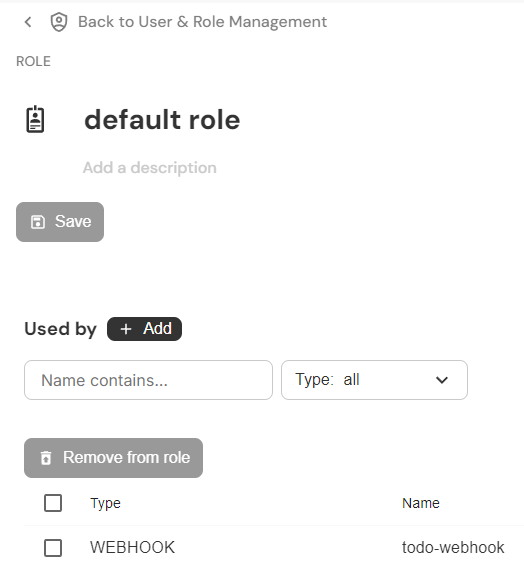
Add a role to an identity from the role view
Flow API
The resources identity and role both provide the method add_identity_role, which links
an identity to a role. On an identity you pass the role_id; on a role you pass the
identity_id. Both accept a keyword argument propagate which enables or disables
role inheritance.
import flow_api

def handler(system: flow_api.System, this: flow_api.Execution, inputs: dict):
    my_webhook = system.webhook('my-existing-webhook')

    # create a role which the webhook needs to run
    my_role = system.role('my-new-role').save()
    my_role.add_role_permission(project_id=None, table_type='FLOW', operation='READ')
    my_role.add_role_permission(project_id=None, table_type='EXECUTION', operation=None)

    my_webhook.add_identity_role(role_id=my_role.get('id'), propagate=False)
    return this.success('added role to webhook')
Role Inheritance
Previous sections have already hinted at the concept of role inheritance.
Since executions, webhooks, schedules and all other identities can perform
every action a user can on the platform, it is important to be able to limit
their access. An identity can drop some or all rights it currently has by
either doing so explicitly or
implicitly using the propagate flag.
Every identity ↔ role
mapping has an attribute: propagate. Any identity created by another will
have all the roles of the creating identity where this propagate flag is True.
The propagate flag will also be set to True for all child identities which have
obtained a role via this manner.
A user might have two roles:
user,propagate=False: All permissions the user needs for day-to-day operations.automation,propagate=True: All permissions the started executions need.
When the user starts a flow script (ie. creates an execution) it will only have the automation role.
Overriding the default inheritance model
There might arise situations where the default inheritance might not be viable in all situations. Providing the desired roles explicitly is a way around this limitation.
Resources created directly by the user can be modified after being created in the UI.
The flow API provides a keyword argument roles on all function and method calls which create
identities. It accepts a list of dictionaries with they keys name and propagate, where name
should contain the name of the role to propagate.
It is not possible to propagate roles which the calling identity doesn't have.
import flow_api

def handler(system: flow_api.System, this: flow_api.Execution, inputs: dict):

    # call `my-flow` and only give it `my-flow_s-role`.
    # if this execution doesn't have the `my-flow_s-role` but
    # permission to create roles and identities we can do the following
    # to allow inheriting the role:
    my_role = system.role('my-flow_s-role')
    this.add_identity_role(role_id=my_role.get('id'), propagate=False)
    system.flow('my-flow').run(
        roles=[dict(name='my-flow_s-role', propagate=False)],
    )
    return this.success('all done')
Patterns
Webhooks and Schedules
Since webhooks and schedules are also identities they will give roles to executions created by them.
To work such identities need to have permissions to read all resources required by themself. A webhook will need to read the flow which gets executed and be able to create executions. The started execution might require a totally different set of permissions.
This can be modeled by giving the webhook two roles, one for the webhook itself
and another one for the created execution(s), where the webhook role has propagate
set to False.
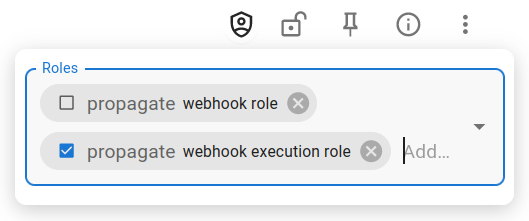
Add two roles to the webhook
It is possible to render a webhook, or for that matter any identity, unusable by giving it insufficient permissions. Care should be taken that they have all required permissions during configuration.
Connections
If connections reference vault secrets the identity creating these must also have read permission on the vault configuration.
Bundles
Access to resources in bundles is controlled by setting permission for the record type BUNDLE. This means that if you have read permission for
the record type BUNDLE you will be able to read all resources that are associated with any bundle.
In order for a bundle permission to work correctly, the project of the permission should be set to "All Projects".
Bundles are read-only by nature. However, if you have permission for all operations on bundles you can remove the read-only flag and modify bundle content.
Custom objects
Every custom object shares the CUSTOM_OBJECT record type, so a CUSTOM_OBJECT
permission applies to custom objects of every object template. To narrow a grant to
a single kind of custom object, set its object template. The permission then
applies only to custom objects of that object template.
The object template refines a CUSTOM_OBJECT grant:
- Object template unset — the permission applies to all custom objects allowed by its project and operation.
- Object template set — the permission applies only to custom objects whose object template matches.
For example, one role can be granted READ on custom objects of the ticket
object template while another role is granted READ on invoice custom objects in
the same project. Each role sees only its own kind of custom object, both when
reading a single record and when listing.
A CUSTOM_OBJECT grant is self-sufficient for the custom object's value: a read
grant reads a custom object's value (including its attribute values), and a
create or update grant creates or updates a custom object's value. Neither
requires an OBJECT_TEMPLATE grant.
The object-template refinement applies to the CUSTOM_OBJECT record type. The
object template itself — its attribute definitions and hook scripts —
is governed by a permission on the OBJECT_TEMPLATE record type, so a role can
read and write custom objects without access to their object template.
User interface
When you add or edit a role permission and set the record type to Custom object, an Object template field appears. Leave it empty to grant access to all custom objects, or select an object template to restrict the grant to that kind of custom object.
Flow API
add_role_permission accepts an object_template_id argument that refines a
CUSTOM_OBJECT grant to a single object template. Leave it unset for a grant that
covers all custom objects.
import flow_api

def handler(system: flow_api.System, this: flow_api.Execution, inputs: dict):
    role = system.role('ticket-readers').save()

    ticket_template = system.object_template('ticket')

    # grant READ on `ticket` custom objects in every project
    role.add_role_permission(
        table_type='CUSTOM_OBJECT',
        object_template_id=ticket_template.get('id'),
        operation='READ',
    )
    return this.success('scoped role created')