Object Templates and Custom Objects
In Cloudomation Engine you can store data in a similar way to a relational database, with the help of custom objects. Moreover, you can define hooks, that automatically handle lifecycle events like creating or updating a custom object.
There are other simpler ways to store data in Cloudomation Engine like Settings or Files. They are easier to use initially because they don't require the definition of an object template. However, you cannot define hooks for them or cross-reference them to each other.
The best way of storing data depends on the use-case. Generally, complex the data is suited better for custom objects while something more simple (e.g. storing a return code) can be done with settings or files.
Use Cases
You can use custom objects whenever you need to store structured information. Here are some examples:
-
Mailing lists
If your workflows send out emails (e.g. notifications on errors), you can store a mailing list of the users that should receive the email.
One way would be to store this list in a setting, and add/remove items when the mailing list changes.
A more sophisticated approach would be to use custom objects. This way you can validate entries, and define hooks (e.g. when a new user is added to the list, they receive a notification that they were signed up for the mailing list).
-
Discount codes
If you use Cloudomation Engine for processing orders from a webshop, you can store discount codes as custom objects.
You can define attributes for the discount codes (e.g. code, percentage, validity) and set up a hook that notifies your customers about new discount codes.
-
Cloud development environment (CDE) management
Cloudomation DevStack relies heavily on custom objects to keep track of virtual machines (VMs) for CDEs, and automate their lifecycle events.
This is a good example of the scope of automation you can achieve with custom objects. Simply by creating a new custom object (a new CDE) you trigger a series of events:
- deploying and starting a VM from a snapshot,
- setting up the Known Hosts File and Authorized Keys File on the VM,
- providing a command to the user for connecting to the VM via SSH,
- scheduling a configurable shutdown of the VM to save costs,
- etc.
Concept
Custom objects go hand in hand with object templates.
Object Templates
Object templates are the blueprint for creating custom objects. You can define the structure that every custom object that is based on a specific object template will share.
You can create object templates just like any other Cloudomation Engine resource in the UI ("Create +" -> "More" -> "Object template").
If we stick to the comparison with a relational database, you can think of object templates as a table in a database. The attributes are the columns, with a data-type and other properties (e.g. uniqueness, nullability).

An empty object template
Attributes
Attributes define how and what kind of information is stored in the custom objects that are based on the object template. Each attribute has the same characteristics:
| Name | Description |
|---|---|
| Datatype | What kind of data to store e.g. boolean or string. |
| Reference | Reference to another object (applicable only if the data-type is a reference). |
| Is nullable | Whether the attribute can be set to null. |
| Default value | An optional value that is written into a new custom object when the attribute is left out on creation. See Default values and required attributes. |
| Allowed values | For the ALLOWED_VALUES datatype: the fixed set of choices the attribute accepts, rendered as a dropdown. See Allowed values (dropdowns). |
| Is unique | Whether multiple custom objects based on the same object template can have an attribute with the same value. |
| Is hidden | Whether the attribute is shown when you open the custom object. |
| Silent update | Whether an update of the attribute triggers the on update hook. |

This object template has two attributes
The order in which attributes appear — in the custom-object form, in list views, and in the attribute table — is curated rather than alphabetical. Newly added attributes are appended at the end.
To change the order, open the object template screen and press Re-order above the attributes list. A dialog lists every attribute with a drag handle; drag the rows into the desired order and press Save to persist the whole order in a single step. You can also drag the attribute cards in the Object Template Canvas.
Hooks
Hooks help you automate lifecycle events. A hook can be something very simple, like sending an email. It can also be complex, like executing multiple stored procedures and parsing their return values or deleting a resource group at a cloud provider.
There are 4 types of hooks you can define:
-
Before create
Gets triggered before a custom object is created. The hook's output value is supplied to the custom object creation.
Example usage: supplying default values for the creation of the custom object.
-
On create
Gets triggered after a custom object is created, and again when a custom object is restored from the trash.
Example usage: deploying a VM.
-
On update
Gets triggered after a custom object is updated.
Example usage: sending a notification email to the user that the custom object was updated.
-
On delete
Gets triggered when a custom object is deleted, including when it is moved to the trash (a soft delete).
Example usage: deleting a VM.
Hooks are implemented as flows. When a hook is triggered by a lifecycle event (e.g. updating a custom object), the specified flow gets executed.
The following information about the custom object gets passed as input_value to the flow execution:
| Name | Description |
|---|---|
value | A key-value pair with the current values of the custom object. Gets passed on create and on update. |
old_value | A key-value pair with the values before the lifecycle event. Gets passed on update and on delete. |
custom_object | A reference to the custom object. |
custom_object_id | The id of the custom object. |
provisioning_type | The type of the lifecycle event. |

Here, two hooks are defined that will be triggered if a custom object is created or deleted
Hook firing across the trash lifecycle
A custom object can be moved to the trash (a soft delete), restored from the trash, or permanently deleted. Across these transitions on_delete fires exactly once per deletion and on_create fires again on restore:
- Moving a custom object to the trash (a soft delete) triggers the
on_deletehook. The object is still readable while the hook runs, so the hook can access its values to tear down whatever it manages. - Restoring a custom object from the trash triggers the
on_createhook, mirroring the original creation. - Permanently deleting a custom object:
- when the object is live (never trashed, or restored before this delete), triggers the
on_deletehook, then removes the record; - when the object is already in the trash — where
on_deleteran at soft-delete time — removes the record without triggeringon_deleteagain.
- when the object is live (never trashed, or restored before this delete), triggers the
Moving a bundle or project to the trash, or restoring it, cascades to the custom objects it contains, but the lifecycle hooks of those contained custom objects are not triggered by the container cascade. Delete or restore a custom object directly to trigger its on_create / on_delete hooks.
Behavior of queued lifecycle hooks and best practices
It is important to understand how lifecycle flows such as on_create, on_update, and on_delete are executed in relation to each other. Cloudomation ensures that these flows are executed sequentially: if an on_create flow is still running when an object is deleted, the on_delete flow will not start until the on_create flow has completed. This behavior might not be immediately intuitive and should be considered carefully when designing lifecycle logic.
Avoid long running lifecycle flows
Lifecycle flows should be designed to terminate quickly after initiating the desired state. While they can schedule or start asynchronous processes that perform long-running tasks (such as waiting or polling), the lifecycle flow itself should not include extended wait periods or blocking operations. Doing so will delay subsequent flows like on_delete, possibly leading to confusing behavior for users.
Example maintenance window
Consider a custom object template for a “maintenance window”, which includes a start_time, end_time, and a reference to an environment object. The goal is to lock the environment during the specified window.
A naive implementation of the on_create flow might:
- Wait until the
start_time. - Lock the environment.
- Wait until the
end_time. - Release the lock.
While this works in principle, it introduces a significant issue: if the object is deleted during the maintenance window, the on_delete flow cannot start until the on_create flow finishes—meaning the lock will remain in place for the full duration, even though the object has been deleted.
This design assumes that deletion interrupts the current flow, which is not the case.
Recommended pattern
Instead of including long waits in the on_create flow, you should:
- Schedule separate flows (executions) to lock and unlock the environment at the appropriate times.
- Create those executions asynchronously to allow the
on_createflow to finish immediately after scheduling those executions. - Store references to those scheduled executions in the
metadataor custom attributes of the object. (Alternatively, you can also store references of the custom object in themetadataof the execution )
This way, if the object is deleted early, the on_delete flow can start promptly. It can also access the references to the scheduled executions and cancel them, releasing the environment lock immediately.
By following this approach it is possible to avoid blocking behavior and ensure that object lifecycle actions are responsive and predictable.
Flow 1 - my_on_create_flow
my_on_create_flow flow starts an asynchronous execution of a seperate flow for handling lock and unlock operations
import flow_api
import datetime

def handler(system: flow_api.System, this: flow_api.Execution, inputs: dict):

    # get input values
    start = inputs['value']['Start']
    end = inputs['value']['End']
    environment = inputs['value_references']['Environment_custom_object']
    custom_object_id = inputs['custom_object_id']
    start_float = datetime.datetime.fromisoformat(start).timestamp()
    end_float = datetime.datetime.fromisoformat(end).timestamp()

    # wait until start of the maintenance window, then lock environment
    setting = system.setting('env-lock').acquire()

    system.flow("handle_lock_seperate").run(wait=False, input_value = {
        "start": start_float,
        "end": end_float,
        "setting": setting,
        "environment": environment,
        "custom_object_id": custom_object_id
    })

    return this.success('all done')
Flow 2 - handle_lock_separate
The handle_lock_separate waits until the start of the maintenance window, locks the environment, and releases the lock at the end of the window.
Additionally, the flow saves its execution details to the metadata of the custom object.
This allows other dependent executions (such as on_delete in our example) to identify and cancel this execution if it becomes stuck in a waiting state.
import flow_api
from datetime import datetime
def handler(system: flow_api.System, this: flow_api.Execution, inputs: dict):
    # wait until start of the maintenance window, then lock environment
    start = datetime.utcfromtimestamp(inputs["start"])
    end = datetime.utcfromtimestamp(inputs["end"])
    custom_object_id = inputs["custom_object_id"]
    environment = inputs["environment"]
    setting = inputs["setting"]

    this.sleep_until(start)

    environment.save(value={
        **environment.get('value'),
        'Is Locked': True,
        'Locked by': custom_object_id
    })

    this.sleep_until(end)

    setting.release()

    environment.save(value={
        **environment.get('value'),
        'Is Locked': False,
        'Locked by': None,
    })

    execution_id = this.get("id")
    custom_object_record = system.record(custom_object_id)
    execution_ref_metadata = custom_object_record.metadata('execution_reference')
    execution_ref_metadata.save(data={
        'execution_id': execution_id,  # Store current execution ID
        'environment': environment,  # Include environment reference
    })

    return this.success('all done')
Custom Objects
Custom Objects can be created based on object templates.
Only users who have at least read access to the object template, that the custom object is based on, can see the custom object in the UI. For more on read access, refer to RBAC.
You can create custom objects just like any other Cloudomation Engine resource in the UI ("Create +" -> "Custom object" -> select the object template you want to use).
If we stick to the comparison with a relational database, you can think of custom objects as rows or entries in a table.

This custom object was created using the object template from before. You can see the attributes that were defined in the object template.
The attribute My name is currently "Unset". To enter a value, first you need to set it from the dropdown.
An attribute can only be "Unset" if it is not required, meaning that the attribute My date always needs to have a value.
Provisioning State
Provisioning states are unique to custom objects and are not found in other Cloudomation resources.
Custom objects change during their lifecycle. They get created, updated, and deleted. The provisioning state shows, if a custom object is currently ready (stable), is going through a change, or if a previous change could not be concluded successfully.
Whenever a hook for a lifecycle event is triggered, the provisioning state changes to represent that event e.g. UPDATING. Whether a change was concluded successfully,
depends on the the status of the execution that gets run by the hook.
If there is no hook defined for a lifecycle event, no flow gets executed and the provisioning state changes to READY.
When we created the custom object above, the On create hook was triggered (just like it was defined in the object template).

The provisioning state changes to CREATING and we can also see the flow execution triggered by the hook.

The provisioning state changes to READY once the flow execution triggered by the hook successfully finishes.
Depending on the complexity of the flow executed by the hook, a change in provisioning states can take a while, especially if the flow interacts with third-party systems.
If a custom object receives changes while it's still transitioning (i.e. the provisioning state is not READY), the changes will be queued and the provisioning executions
will run one at a time, in the order they were created.
Editing Attributes in List Views
Custom-object attributes can be edited directly in a list view, without opening each custom object's own screen. This works anywhere a list shows a template's attribute columns:
- the Custom Objects list on an object template's screen, and
- a dashboard
record_listwidget configured with anobject_template_id(which adds that template's attribute columns).
An editable cell is edited in place. Each edit commits one attribute and leaves the custom object's other attributes unchanged; after a successful save the list reloads, so a following edit acts on fresh data.
How a cell is edited depends on the attribute's datatype:
| Attribute datatype | In-list editor |
|---|---|
| Boolean | A switch that toggles and commits immediately. |
| Allowed values (dropdown) | A dropdown that commits immediately when a value is chosen. |
| Single-line string, integer | Click the cell to turn it into an input. It commits when the cell loses focus or on Enter, and reverts on Escape or when the save fails. |
| Markdown, text, JSON | An edit affordance opens an anchored overlay editor — the same datatype-aware editor the custom-object screen uses — with explicit Save / Cancel. |
| Date, time, date-time | Click the cell to reveal a date / time picker; it commits when a value is picked. Escape, or a click outside the cell and the picker's calendar, closes it without saving. |
Reference attributes (record and object-template references) are shown read-only in list views and are edited from the custom object's own screen.
An edit made in a list view is subject to the same permissions and validation as an edit on the custom object's own screen: an allowed-values attribute rejects any value outside its declared choices, and a required attribute cannot be cleared.
Editing a Custom Object's Name and Description
Alongside its attributes, a custom object's top-level name and description are editable from the same list views. Both show a pencil on row hover:
- Name — the pencil opens a single-line editor that commits on Enter or Save and reverts on Escape or Cancel. A custom object's name is required, so an empty name is rejected, and because names are unique across the workspace, a rename to an existing name is refused with an error.
- Description — the pencil opens an anchored Markdown editor — the same editor the custom object's own screen uses — with explicit Save / Cancel (or Ctrl/Cmd + Enter to save). The description is optional, so the editor opens even when the description is still empty, letting you add a description directly from the list.
The Description column is hidden by default. Add it from the column selector, or list description in a dashboard record_list widget's columns to show it.
The same name and description inline editors are available on the resource listings and on Advanced Search results, where they apply to every resource type — flows, connectors, settings, custom objects, and so on. A row shows the pencil only when its record is editable: a record in a git-write-locked bundle or project stays read-only while the lock is held, and non-resource rows such as executions are read-only — in addition to the read-only cases below. The Description column is hidden by default here too; add it from the column selector.
When a Cell Is Read-Only
A cell shows no edit affordance and stays read-only when any of the following holds:
- the custom object is read-only, or belongs to a read-only project or bundle (see RBAC),
- the custom object is in the trash,
- the attribute is a secret (its value is masked), or
- the attribute's datatype has no in-list editor (see the table above).
Dedicated flow_api Methods
For easier access and manipulation of object templates and custom objects, the flow_api provides dedicated methods. The entry point for these methods is system.object_data,
or its alias system.od.
Here are some examples how you can:
-
list object_templates:
for object_template in system.object_data:... -
access an object_template by name:
system.object_data.object_template_name# orsystem.object_data['object-template-name'] -
list custom_objects of a specific object template:
for custom_object in system.object_data.object_template_name:...# orfor custom_object in system.object_data['object-template-name']:... -
access custom object by name:
system.object_data.object_template_name.custom_object_name# orsystem.object_data.object_template_name['custom-object-name'] -
create custom object or write multiple custom object attributes:
system.object_data.object_template_name.custom_object_name = {'attribute1': 'value1', 'attr2': 42, ...}# orsystem.object_data.object_template_name['custom-object-name'] = {...} -
delete custom object
del system.object_data.object_template_name.custom_object_name# ordel system.object_data.object_template_name['custom-object-name'] -
access custom object attribute
system.object_data.object_template_name.custom_object_name.attribute_name# orsystem.object_data.object_template_name.custom_object_name['attribute-name'] -
write custom object attribute
system.object_data.object_template_name.custom_object_name.attribute_name = 'new value'# orsystem.object_data.object_template_name.custom_object_name['attribute-name'] = 42
Object Template Canvas
In the object template canvas you can see object templates and custom objects of a project or bundle. Use the button to switch between viewing object templates or custom objects.

The button to switch between viewing object templates or custom objects.
Object Templates
The object template canvas provides you with a visual overview of object templates and relations between them, just like a database schema.
It also enables you to create and edit object templates, as if you navigated to an object template in the UI. Editing with the object template canvas has the advantage of showing you how your changes affect other object templates i.e. references.
Each project/bundle has its own object template canvas. A canvas shows all object templates that are in the respective project/bundle, plus any object template that stands in relation with them. To navigate to the object template canvas, click on the button shown below.

The object template canvas button.
If there are no object templates in the project/bundle, an empty canvas is shown:

The empty canvas.
Below you can see an object template canvas of the DevStack bundle. It has two object templates: cde and cde-type. The arrow pointing from cde to cde-type
signals that cde has an attribute that references cde-type, just like a foreign key.

The canvas of the DevStack bundle.
The button on the top left lets you create more object templates. The two buttons stacked on each other on the bottom left will let you center or rotate the canvas.
Let's now take a look at the individual parts and what you can use them for. On the top of an object template you can:
- see (by hovering) and define (by clicking) the flows for the hooks,
- change the name of the custom object (click on the name),
- navigate to it (click on button with arrow pointing to top-right),
- access more options (click on ellipsis),
- save your changes with the save button.

The top part of an object template in the canvas.
On the bottom you can see the attributes and the button to add more attributes. To examine and edit the properties of an attribute, simply click on it.
You can also drag the attribute cards to reorder them. The new order is saved as the attribute order and is used everywhere the attributes are shown — the custom-object form, list views and the attribute table. Reordering is available once the template has more than one attribute, the template is editable, and there are no unsaved changes on the canvas.

The bottom part of an object template in the canvas.

The details (e.g. datatype, uniqueness etc.) of an attribute. To see their values, hover over them with the mouse.
Custom Objects
The object template canvas also shows custom objects grouped by object template.
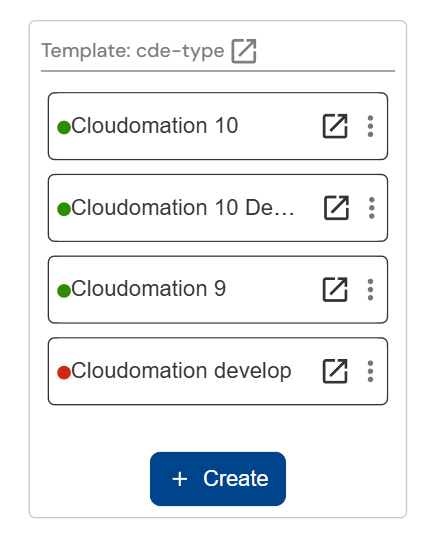
The custom objects of the cde-type object template.
When a template contains many custom objects, the canvas loads the first 25 of them per template for the initial view and indicates the rest with a Showing n of m label on that template's container, next to a Load more and a Load all button. Load more adds the next page of custom objects for that template; Load all adds every remaining one. Each template's container loads its own custom objects independently, so a template with many objects does not hold up the rest of the canvas. The read-only dashboard embed described below shows its filter-scoped set directly and does not include the load-more controls.
You can embed a read-only, filter-scoped version of the custom object relation graph in a Dashboard using the relation_graph widget (mode: custom_object). This is useful for pipeline or installation overviews scoped to a bundle.
Opening the canvas from a record
Object templates and custom objects each provide a link to their canvas. When you open the canvas through that link from a specific record, the canvas highlights that record's node and centers the view on it, so you arrive at the record you came from together with its relations. The highlight and centering apply once the node is present — including when the record belongs to a page that loads later on a large template (see Custom Objects above).
Limitations of Object Templates
Data-Type json
If an attribute has the data-type json, it is automatically set to be required. This is due to JSON allowing for null being a value - which cannot be distinguished
from being "Unset".
If an attribute with the data-type json is not needed in a custom object, you can simply enter the value "null".
Changing Object Templates
When changing an object template that already has custom objects depending on it, there are some limitations, similarly to when changing a table in a database.
Changes that would result in an invalid custom object cannot be done. For example, you cannot add a non-nullable attribute without a default value to an object template that already has custom objects, because the existing objects would have no value for it.
Making an existing attribute non-nullable. When you tighten an attribute from nullable to non-nullable and some existing custom objects hold null for it:
- if the attribute has a default value, those
nullvalues are automatically backfilled with the default (atomically, in the same change); - if it has no default value, the change is rejected with an error naming how many custom objects would be left without a value — set a default value (to backfill them) or give those objects a value first.
Setting a default value on an attribute that stays nullable does not overwrite existing null values; the default then only applies to newly created custom objects.
Default Values and Required Attributes
Each attribute can define an optional default value. When a custom object is created without a value for that attribute, the default value is written in its place. This lets you add attributes that always hold a meaningful value without forcing every creator to supply one.
How the default value is applied
- Only absent attributes are filled. If the attribute is supplied on creation — even explicitly as
null— your value is kept and the default is not applied. - The default value is applied on creation only. Updating a custom object never re-applies the default, so an attribute you deliberately clear stays cleared.
- A default value must match the attribute's datatype (for example, a
NUMBERattribute only accepts a numeric default). For the reference datatypes (RECORD_REFERENCE,OBJECT_TEMPLATE_REFERENCE) the default is an existing target record, picked from a searchable dropdown in the Console: aRECORD_REFERENCEdefault is any record of the referenced record type, and anOBJECT_TEMPLATE_REFERENCEdefault is a custom object of the referenced object template. Choose the referenced record type (or object template) first, then pick the default record. While a record is in use as a reference default it cannot be deleted — clear or change the default first.
Required attributes
An attribute is required when it is not nullable and has no default value. Creating a custom object that does not satisfy a required attribute is rejected with a clear error instead of silently storing an empty value:
- Leaving a required attribute out entirely (absent) is always rejected.
- Sending an explicit
nullfor a required attribute is also rejected — with one exception: attributes of datatypeJSON. AJSONattribute can never be nullable (see Data-Typejson), yetnullis a legitimate JSON value, so an explicitnullis accepted for a requiredJSONattribute.
To make an attribute optional, either mark it nullable or give it a default value — either one removes it from the required set.
Allowed Values (Dropdowns)
An attribute can restrict what may be stored in it to a fixed set of choices by giving it the datatype ALLOWED_VALUES. Such an attribute is rendered as a dropdown in the Console, and any write that is not one of the declared choices is rejected — so the stored data can never drift off the list. This is ideal for fields like status, category or priority, where only a known set of values makes sense.
Declaring the choices
When you set an attribute's datatype to ALLOWED_VALUES, you supply its list of allowed values. Each entry has:
- a value — what is actually stored in the custom object, and
- an optional label — a friendlier text shown in the dropdown. When no label is given, the value itself is displayed.
The list must be non-empty and its values must be unique. An object template that declares an empty list, duplicate values, or a default value that is not one of the allowed values is rejected when you save the attribute.
In the Object Template Canvas, the allowed values are edited in the attribute side-panel with a compact editor: a table of rows — each row a Value (what is stored) and an optional Label (the display text) — with a button to remove a row and a + Add allowed value button to append one.
How writes are validated
- On create and on update, the attribute accepts only one of the declared values. Any other value is rejected with a clear error. On update, a rejected write leaves the previously stored value unchanged.
- This holds whether the attribute is nullable or not.
Interaction with nullable, default value and required
- A non-nullable
ALLOWED_VALUESattribute must always hold one of the choices and renders as a plain dropdown. - A nullable
ALLOWED_VALUESattribute renders as a clearable dropdown that additionally acceptsnull, so it can be left unset. - A default value, if set, must itself be one of the allowed values. As with any attribute, it is written when the attribute is absent on creation (see Default values and required attributes).
- A non-nullable
ALLOWED_VALUESattribute with no default value is required, following the same rules as any other required attribute.
Markdown Attributes
An attribute with the datatype MARKDOWN stores rich text written in Markdown. When you open a custom object, such an attribute is shown as rendered Markdown by default (a preview): links are clickable and text can be selected and copied.
To edit it, click the pencil button to the right of the field — the preview is replaced by a plain-text editor holding the raw Markdown source, which is saved like any other field. While editing, the button turns into an eye icon that switches back to the rendered preview. The edit button appears only when the attribute is editable; on a read-only custom object the attribute stays in the rendered preview with no way to switch to the editor.
An optional (nullable) MARKDOWN attribute is editable even while still unset: an empty editor is rendered so you can add content. When the custom object is read-only, an unset optional Markdown attribute is omitted from the form entirely.
Example
Here's how a simple framework for storing and utilizing a mailing list could look like.
The goal is to have a mailing list that stores users. Each user has a category that defines which mails they are subscribed to. When a user is added or removed, or if their category is changed, they should get an email notification.
We will need flows for the lifecycle event hooks. We will also need a template for items on the mailing list.
Flows for the Hooks
On Create
This is the flow that gets executed on creation of a new item (i.e. a new user) on the list. It receives a reference to the user and the category in its input value and notifies the user about being added to the list.
We will call this flow "Mailing List Item on create".
import flow_api

def handler(system: flow_api.System, this: flow_api.Execution, inputs: dict):
    category = inputs['value']['Category']
    user = inputs['value']['User_user']

    user.send_mail(
        subject='Added to mailing list',
        text=f'You are now subscribed to all mails with category {category} and below',
    )

    return this.success('all done')
On Delete
This is the flow that gets executed on deletion of a new item on the list. It is almost identical to the on create flow. It receives a reference to the user and the category in its input value and notifies the user about being deleted from the list.
We will call this flow "Mailing List Item on delete".
import flow_api

def handler(system: flow_api.System, this: flow_api.Execution, inputs: dict):
    user = inputs['old_value']['User_user']

    user.send_mail(
        subject='Removed from mailing list',
        text='You are not subscribed anymore to mails.',
    )

    return this.success('all done')
On Update
The on update flow is similar to the other flows. However, it also needs to account for the case, that the user gets changed, which is equivalent to adding the new user and deleting the old user.
We will call this flow "Mailing List Item on update".
import flow_api

def handler(system: flow_api.System, this: flow_api.Execution, inputs: dict):
    new_category = inputs['value']['Category']
    new_user = inputs['value']['User_user']
    old_category = inputs['old_value']['Category']
    old_user = inputs['old_value']['User_user']

    if old_user != new_user:
        # the on create flow
        system.flow('Mailing List Item on create').run(
            value={'User_user': new_user,'Category': new_category}
        )

        # the on delete flow
        system.flow('Mailing List Item on delete').run(
            old_value={'User_user': old_user}
        )

    else:
        new_user.send_mail(
            subject='Changed category on mailing list',
            text=f'You are now subscribed to all mails with category {new_category} and below (old category: {old_category}).',
        )

    return this.success('all done')
When calling the on create flow, we pass the argument value. However, when calling the on delete flow, we pass the argument old_value.
Object Template for Mailing List
We can now create the object template and define the hook, using the flows from before.

The template with the hooks defined.
Now add two attributes: User and Category.

The User attribute.
User is unique. This means that a user can only be added once to the list.

The Category attribute.
And that's about it. Now we have a template that defines items on the mailing list. When an item is added, changed, or removed, the user will be notified.
Adding an Item to the Mailing List
Let's see how this works in action. Let's add an item to the mailing list i.e. create a custom object using the template above.

Here is the first item that we added. We selected a user and specified the category
Once you save the item (i.e. the custom object), the on create hook is triggered, and the User is notified via email.
You can also see the provisioning state changing from CREATING to READY as the on create flow is executed by the hook.
Accessing the Mailing List
You can integrate the mailing list (i.e. the object template) into a workflow by accessing it's items (i.e. the custom objects). The custom_object_list method of an object template returns all its custom objects.
Below is a flow script that takes category, subject, and text as inputs. For each input there is a default set. The script fetches all users (i.e. the custom objects)
from the mailing list and then sends an email if the user's category allows it.
import flow_api

def handler(system: flow_api.System, this: flow_api.Execution, inputs: dict):
    category = inputs.get('category', 0)
    subject = inputs.get('subject', 'This is a test')
    text = inputs.get('subject', 'You friendly neighbourhood test email')

    # get the mailing list
    mailing_list_items = system.object_template('Mailing List').custom_object_list()

    for item in mailing_list_items:
        user = system.user(item.get('value')['User'], by='id')
        user_category = item.get('value')['Category']

        if user_category >= category:
            user.send_mail(
                subject=subject,
                text=text,
            )


    return this.success('all done')