Git Integration
Using the git integration it is possible to synchronise the content of a git repository with Engine.
Use Cases
Generally it is recommended to store all your Engine resources in git. There are plenty of benefits:
- Use of your favourite offline editor
- Version history of all changes to your automation logic
- Collaboration between users easily possible
- An additional backup of your automation logic
- Branching, merging, rollback, ...
Concept
With git integration configured, all saved changes to resources in Engine are automatically synced to a remote repository that is provided by Engine as part of the workspace. This means, that whenever you change a flow script, enable or disable a schedule, rename a setting etc... a commit is generated and pushed upon saving. The author of the commit is your Engine user.
On the other hand, you can also make changes to resources in your local repository and upon committing and pushing, these changes will be reflected in Engine.
Scope of the synchronisation
You can set up the synchronisation for projects, bundles or the workspace. Only resources within the given project or bundle will be tracked. The git integration for the workspace tracks resources that are not part of a project or a bundle (e.g. users). Activities (such as executions or messages) are not tracked by the git integration.
Activities (e.g. executions or messages) are not tracked by the git integration.
Folder structure
Tracked resources can be found in the designated cloudomation-resources folder of the repository. Everything outside of this folder will be ignored by the git integration
and can be used for your own purposes e.g. readme files, templates, etc.
The resources you will find in cloudomation-resources have the file pattern like any other Cloudomation export i.e. a resource can be represented by of multiple files.
For example a flow called my-flow is exported as my-flow.flow-description.txt and my-flow.flow-script.py.
You can read more about Cloudomation export file formats here.
cloudomation-resourcesFiles committed inside cloudomation-resources that are not Cloudomation resource files — build artifacts or editor/OS cruft such as __pycache__/, *.pyc or .DS_Store — are tolerated rather than treated as an error. A stray artifact therefore does not block bundle content operations for the whole repository.
- Files matching one of the configured ignore globs (
GIT_SYNC_IGNORE_FILE_PATTERNSin the workspace configuration) are skipped silently. - Any other file that does not match the resource file naming pattern is skipped with a warning in the logs.
Adjust GIT_SYNC_IGNORE_FILE_PATTERNS if you keep additional non-resource files in the folder and want them ignored without a warning. A pattern ending in / matches a directory name anywhere in the path; any other pattern is matched (fnmatch-style, case-sensitive) against both the full path and each individual path segment.
The authoritative record name lives inside the resource's base file (the name: field of the .<type>.yaml file), not in the file name. On import the name is read from that content.
For most records the on-disk file name still mirrors the record name exactly (the record name, sanitised for the filesystem). For a record whose name is long enough that the resulting file name would exceed the filesystem's 255-byte limit on a single path component, the file name is truncated to a byte-safe prefix followed by a marker ~<hash>~ (where <hash> is derived from the full name). The record still imports under its true, full name because that name is stored in the file content; the marker only signals that the file name is a shortened stand-in.
Consequently:
- The
name:field is part of every base file and is the source of truth for the record name. - Renaming a resource file on disk does not rename the record. To rename a record, change its
name:field (or rename it in Engine and let the export update the file). - If a base file's
name:disagrees with its file name and the file name carries no~<hash>~truncation marker, the import fails with a clear error rather than importing under the wrong name — this guards against an accidental manual rename or a corrupted file. - A base file that contains no
name:field takes its record name from the file name.
Initial Setup
Per default, the git integration is not set up. To enable the integration navigate to the project/bundle/workspace that you want to synchronize.
Setting up the remote repository
Click on the git actions button to trigger the dialogue for creating a new remote repository, then choose the name of your branch (e.g. develop),
write it into the field "Branch name", and click "Create git repository".

The git actions button.
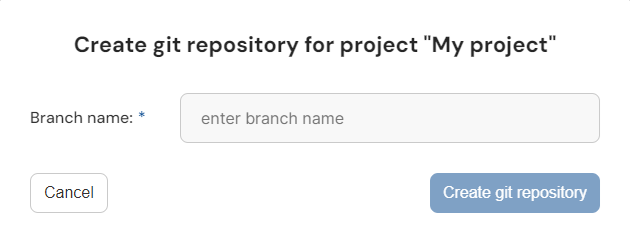
The dialogue for creating a repository.

When a project/bundle/workspace is git enabled, a commit button is shown.

Also the git actions button is marked with a green dot and offers options to manage the git integration.
From now on every change you make, that falls into the scope of the synchronization, will be tracked and you can commit them into the remote repository.
Setting up the local repository
To set up the local repository you can clone the remote repository. You can find the repository URL for cloning by clicking on the git actions button and choosing "Manage git repository". There you will see the "Git URL" in the dialogue window.
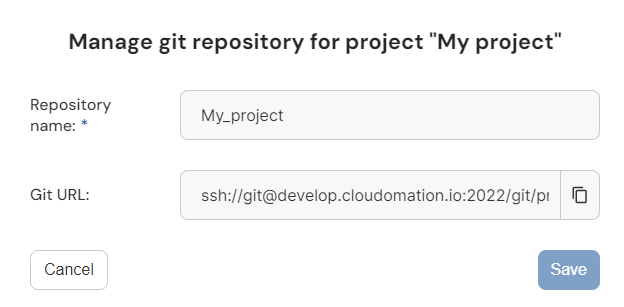
The URL for cloning the repository.
Assigning your public key
Since the cloning uses the SSH transfer protocol, make sure that your Engine user has your SSH public key assigned.
You can see how to check this as described in Adding SSH Public Keys. If there are no public keys listed you need to add the content of your public key.
Cloning the remote repository
Once your user has your public SSH key assigned you can create the local repository by cloning the remote.
This can be done on the command line or you can use the Repository Cloning feature of your offline editor (if it has one).
The git URL is automatically put into quotes if the URL has spaces or special characters, so the command line handles it correctly.
Tools like VSCode or TortoiseGit handle quotes differently and might run into an error like fatal: protocol ''ssh' is not supported.
In this case remove the quotes from the URL after copying it.
- open a command line in the folder where you want to create the local repository
- execute the
git clonecommand with the git URL as parameter. E.g.:
git clone "ssh://git@localhost:2022/git/project/Default project.git" Default
Developing with the git integration
Once you have your local repository you can use git in both directions, synching changes from Engine to the local repository, or from the local repository to Engine.
Synching from the local repository to Engine is done in the same way as you would work with any git repository. You can make changes locally, commit and push them to the remote repository. These changes will then be reflected in Engine.
Committing in Engine
Whether your changes to a resource in a git enabled project/bundle/workspace are automatically committed upon saving, depends on the workspace seting GIT_AUTOCOMMIT_ENABLED

The save button, when GIT_AUTOCOMMIT_ENABLED is set to True
On a git enabled record the save control is a split button offering both Save (save without committing) and Save and commit (save and commit in one step). GIT_AUTOCOMMIT_ENABLED selects which of the two is the primary, single-click action:
- When
True, the primary action is Save and commit; Save is available from the split menu. - When
False, the primary action is Save; Save and commit is available from the split menu.
You can also commit changes separately from saving — individually or together with other changes — using the dedicated git actions in Engine.
If the git integration is enabled, it is best practice to not accumulate too many uncommited changes. Once you have finished working on a change, make sure to commit it or if you don't want to keep the changes, reset them to the status in git.
In the UI
Let's add 2 new flows to the project: flow-1 and flow-2. You can commit these changes individually, by navigating to the new flows and clicking on their
respective commit buttons. This will open a dialogue that lets you edit the commit message, and also lets you switch to bulk commit mode.
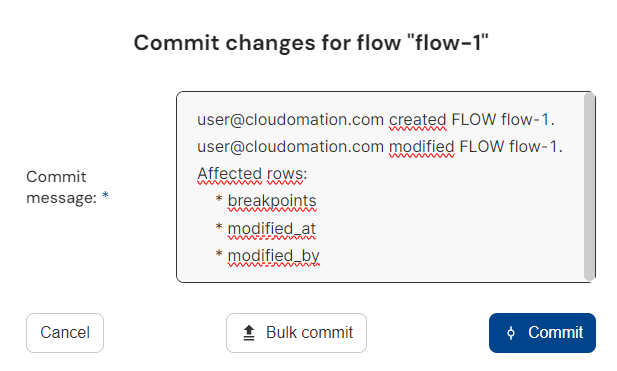
The dialogue for committing a single change
Instead of committing, let's switch to bulk commit.
The dialogue lets you choose which resources you want to commit and also lets you generate a commit message. When you are ready, click on "Bulk commit".
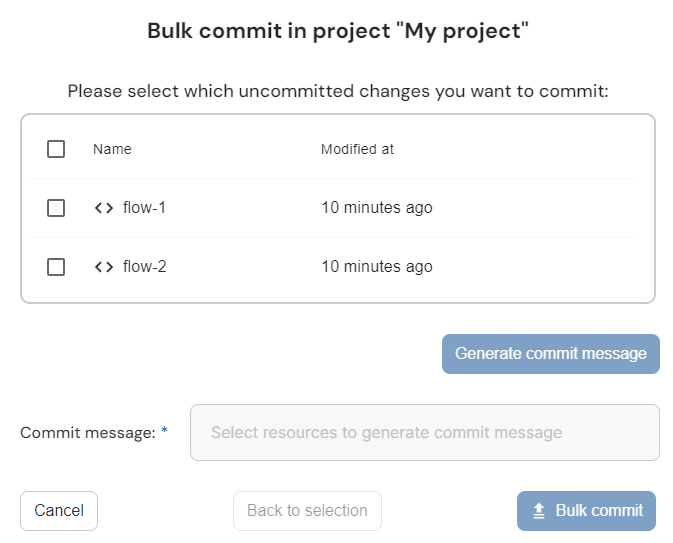
The dialogue for committing a multiple changes
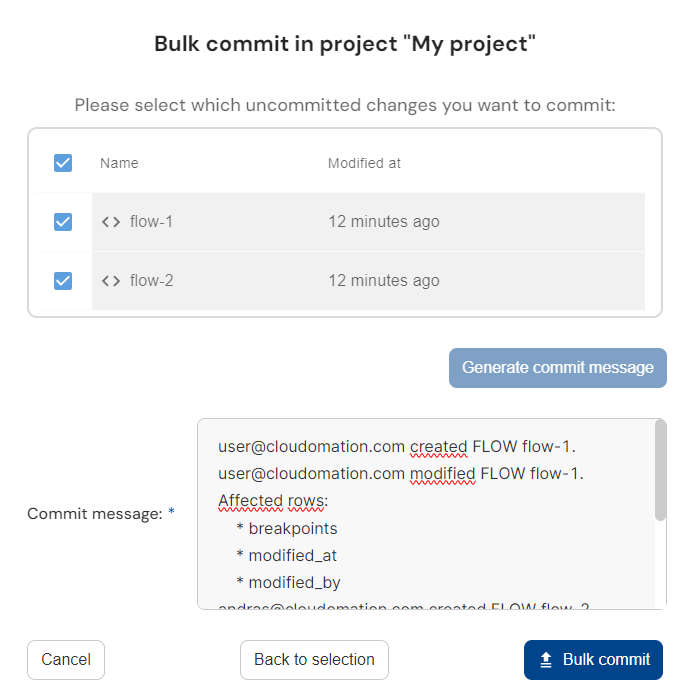
Now with the selection and a generated commit message

The message to signal a successful commit
Clicking the commit button on a resource open a dialogue to commit changes to that resource only. You can access bulk commit either from this dialogue window, or by clicking on the ellipsis next to the commit button and choosing "Bulk commit".
In the flow_api
You can commit changes to a resource with the commit method. This will use a generated commit message.
Modifying the description of a flow and committing it:
import flow_api

def handler(system: flow_api.System, this: flow_api.Execution, inputs: dict):
    flow = system.flow('my-flow')
    flow.save(
        description='changed description',
    )
    flow.commit()

    return this.success('all done')
Using the commit method without any parameters will commit all changes to a resource.
You can modify the commit message by supplying the message argument to the commit method. You can also choose, which changes to commit by supplying the git_log_ids argument.
To see all changes to a resource, list them with the git_log_list method.
Listing changes to a flow and committing the oldest one with a custom commit message:
import flow_api

def handler(system: flow_api.System, this: flow_api.Execution, inputs: dict):
    flow = system.flow('my-flow')
    flow.save(
        description='changed description',
    )
    git_log_list = flow.git_log_list(order='timestamp')
    flow.commit(git_log_ids=[git_log_list[0]], message='My commit message')

    return this.success('all done')
Instead of a separate save() and commit(), you can write and commit in a
single call: pass commit=True together with commit_message on the record
accessor (or save()). The implicit per-record commit then uses the supplied
message, so you do not need the two-step save() … commit() dance. Omitting
commit_message keeps the autogenerated message. commit_message is honoured on
create, update, delete, move and rename.
Changing a flow's description and committing it with a custom message in one call:
import flow_api

def handler(system: flow_api.System, this: flow_api.Execution, inputs: dict):
    system.flow('my-flow', commit=True).save(
        description='changed description',
        commit_message='flow(my-flow): update description',
    )

    return this.success('all done')
Creating and Changing Branches
You can create and change branches in the Engine UI. To do so, open the git action and click on "Manage git branch".
To switch to an already existing branch, select the branch from the drop-down. To create a new branch, type in the branch name and click on "Create"
The resources you see in a git enabled project/bundle/workspace reflect the selected branch. When you switch to a different branch, resources that are not tracked in that branch will be removed. Similarly, resources that are tracked in the new branch but not the old one, will be added.
You can also create branches in your local git repository. The Cloudomation UI lists all existing branches in the "Manage git branch" regardless if they were created in the UI or directly in the repository.
Resetting resources in Engine
When you make changes to a resource that turn out to be wrong or unnecessary, you can discard them and restore the resource to the status in git. To do so, go to the resource and hover over the ellipsis next to the commit button. Click on "Reset to status in git".

The extended options of the commit button.
To reset multiple resources at once, you can use the bulk reset feature. You can access it by clicking on the button "Bulk reset status to git" in the git actions.

The button to reset multiple resources at once.
Resetting a resource that was renamed, can overwrite an existing resource if it uses the original name of the renamed resource.
E.g. if you rename my-flow to my-flow-2 (without committing), then create a new resource called my-flow,
then reset my-flow-2 to the status in git, the content of my-flow will be overwritten.
If you want to undo a change that is already committed, you can do so by using regular git commands like git reset or git revert in your local repository
and pushing the changes to the remote repository.
Reverting commits and other git actions
If you want to perform more complex actions in git (revert, reset, cherry-pick etc.), you can do so in the local repository. Once you're done, push the changes to the remote repository.
Configuration
Default track in git
Projects, bundles, and the workspace have a Default track in git setting in the details panel. It controls whether new resources created in that container are tracked in git by default.
When enabled (the default), new resources inherit track_in_git = true unless you set it explicitly when creating the resource. When disabled, new resources are not tracked in git unless you enable tracking for each resource individually in its details panel.
Changing this setting does not affect existing resources — only resources created after the change.
Force track in git
Projects, bundles, and the workspace also support Force track in git, configured through the force_track_in_git field on the container — from the container's Details panel in the Console, or through the record API or the flow_api. It is the non-overridable companion to Default track in git: where the default merely sets track_in_git for new resources and a per-resource value can override it, Force track in git cannot be overridden. When it is enabled, records created in the container — and changes that reference the container — are tracked in git. A request that omits track_in_git (or sets it to true) tracks the record as normal; a request that explicitly sets track_in_git = false is rejected with an error (InvalidInputError, HTTP 400) rather than silently overridden, so the conflict with the container's guarantee is surfaced to the caller instead of being quietly corrected.
Use it for containers whose contents must always be recoverable from git: enabling it guarantees that no record in the container escapes the git backup — an explicit track_in_git = false is rejected, and a creation path that would otherwise leave the record untracked instead tracks it. Where Default track in git fits the common case in which tracking is a sensible default but individual resources may opt out, Force track in git fits the stricter case in which opting out is not permitted.
It is disabled by default, and applies to records created or changed after it is enabled — enabling it does not retroactively track records that already exist untracked in the container.
# flow_api: guarantee every record in this bundle is tracked in git
system.bundle('My bundle').save(force_track_in_git=True)

# remove the guarantee again (records keep their current tracking)
system.bundle('My bundle').save(force_track_in_git=False)
Default is bundle content
Bundles have a Default is bundle content setting in the details panel. It controls whether new records created in the bundle are marked as bundle content by default (is_bundle_content = true), which determines whether they are exported as part of the bundle.
When disabled (the default), new records are not marked as bundle content unless you enable it per record. When enabled, new records inherit is_bundle_content = true unless you set it explicitly when creating the record.
This setting applies to bundles only: only a record inside a bundle can be bundle content, so projects and the workspace do not have it.
Changing this setting does not affect existing records — only records created after the change.
# flow_api: new records in this bundle are bundle content by default
system.bundle('My bundle').save(default_is_bundle_content=True)
Limit the size of tracked records
Projects, bundles, and the workspace support an optional maximum tracked record size, configured through the max_tracked_record_bytes field on the container (via the record API or the flow_api). When set, the git integration refuses to track any record in that container whose serialized git export exceeds the given number of bytes. This prevents large blobs — for example a multi-megabyte file or setting — from ever entering git history in the first place: a preventive alternative to reactively removing large files from history after the fact.
The limit is enforced whenever a record is first tracked in git and whenever an already-tracked record is changed, so a record that grows past the limit is rejected too. The size measured is the exact serialized content that would be written to git (the same bytes stored in the repository), not the record's raw in-database size.
When a record exceeds the limit the save is rejected with an error naming the record, its serialized size, and the container limit — and no commit is made. To allow a specific oversized record, raise or clear the container's max_tracked_record_bytes (leave it empty for no limit).
By default no limit is set, so existing containers are unaffected until you opt in per container.
# flow_api: cap tracked records in a bundle at 512 KiB
system.bundle('My bundle').save(max_tracked_record_bytes=512 * 1024)

# remove the limit again
system.bundle('My bundle').save(max_tracked_record_bytes=None)
Disabling the git integration
To disable the synchronization for a project/bundle/workspace click on "Disable git" from the git actions button.

The button to disable the git integration
If you disable the git integration for a resource, the remote repository will be deleted including all history. This cannot be undone.
Re-synchronising the remote and local repository (needed after renaming the remote repository)
Renaming the remote repository of a synchronised project/bundle/workspace automatically changes the URL of the remote repository. To ensure that you can push changes from your local repository to the remote repository, you need to adjust the remote path of your local repository accordingly.
Let's assume that you have a git enabled project with the remote repository called My project. The corresponding URL is ssh://git@localhost:2022/git/project/My project.git.
You decide to rename the remote repository to My new project. The new URL is now ssh://git@localhost:2022/git/project/My new project.git.
Here's how you can adjust the remote of your local repository to reflect this change:
- open a command line in the folder where your local repository is
- (optional) you can display the current remote with the
git remote -vcommand
$ git remote -v
origin	ssh://git@localhost:2022/git/project/My project.git (fetch)
origin	ssh://git@localhost:2022/git/project/My project.git (push)
- change the remote to the new URL
$ git remote set-url origin 'ssh://git@localhost:2022/git/project/My new project.git'
- display the remote to confirm that the change is successful
$ git remote -v
origin	ssh://git@localhost:2022/git/project/My new project.git (fetch)
origin	ssh://git@localhost:2022/git/project/My new project.git (push)
Reducing Disk Space Usage
Git is efficient at storing history and in most cases commits don't significantly increase disk usage over time. However, an exceptionally long commit history or commits that include large changes to files can lead to excessive disk usage.
Here are some ways you can reduce the disk usage with native git methods.
To stop large records from entering history in the first place, set a maximum tracked record size on the container. That is a preventive guard; the methods below are for cleaning up history that already grew too large.
The following methods rewrite git history and require you to force push changes into remote repositories. Be sure to understand the implications before proceeding.
Remove Old History
If your git history is very long, you could decide that old commits are not of interest any more. In this case you can choose a cut-off commit and remove any previous commits from the history. This does not affect the current content of your repository.
In your local repository:
-
shallow your repository to the commit of your choice:
git rev-parse <commit-sha> > .git/shallow -
remove other branches, tags that reference the deleted commits:
git gc --prune=now -
push your changes to the remote:
git push --force-with-leasenoteThe option
--force-with-leaseensures that you only overwrite the remote if it has not been changed since the last time you fetched it. This is to prevent overwriting commits that you are not aware of.
Remove Specific Files From History
If specific files cause a large portion of the disk usage, you can delete them from the git history. This can be done both with files that still exist or have been deleted already.
This method needs a third-party git add-on git-filter-repo.
You can either install it with following their installation guide, or with pip by running
pip install git-filter-repo
In your local repository:
-
(only if the file still exists) rename the file that you want to delete from the history.
E.g. from
my-file.pytomy-file.py_save -
delete the file from the history:
warningIf the file still exists, make sure to use the original file name (e.g.
my-file.py) in thepathargument, otherwise instead of deleteing the file from the history you delete it from the repository.git filter-repo --invert-paths --path <path to the original file> -
(only if the file still exists) rename the file back to its original name
E.g. from
my-file.py_savetomy-file.py -
commit your change locally
-
push your changes to the remote:
git push --force-with-leasenoteThe flag --force-with-lease ensures that you only overwrite the remote if it has not changed since the last time you fetched it. This is to prevent overwriting commits of other contributors.