Schema Creation and Validation
Engine allows you to define Schemas against which you can validate data. Schemas can be defined as an Engine resource or directly in the relevant field (e.g. "Input schema") of selected resources (e.g. flows).
Use Cases
Use Schemas to
- validate input data for flows or connections,
- validate output data to ensure you received all necessary data for further processing,
- coerce your data and ensure it is transformed to the correct data types for further processing.
- create a form for input values of wrappers
Concept
In Engine you can define a Schema both via the user interface with Create or directly inside a Flow. Afterwards, you can validate or coerce your data against a given Schema.
A Schema allows you to define e.g.:
- keys to be validated,
- data
type, - data
format, defaultvalues if a key is not present,requiredkeys.
Upon successful validation or coersion the (coerced) data is returned.
Currently, JSON schema validation with draft 7 formatting is implemented.
When validation of the data fails a flow_api.exceptions.SchemaValidationError exception is raised. You can handle this exception as described in Exceptions
When the schema itself is invalid, a flow_api.exceptions.SchemaError exception is raised. You can handle this exception as described in Exceptions
Schema Resource
Defining a Schema Resource
Schemas can be defined using the user interface of Engine or within a flow script. If you don't want to manually write a JSON schema take a look at the validate wrapper.
Create a Schema in the User Interface
You can simply create a new Schema in the user interface:

The buttons to create a schema
Write your schema in the editor.
Create a Schema Inside Flows
You can save a schema for later validation or coersion within a flow with the following syntax:
system.schema(<schema-name>).save(value=<dict with schema definition>)
See the following example:
import flow_api

def handler(system: flow_api.System, this: flow_api.Execution, inputs: dict):
    system.schema('my schema').save(value={
        'type': 'object',
        'properties': {
            'some_id': {
                'type': 'string',
                'format': 'uuid',},
            'name': {
                'type': 'string',},
            'date': {
                'type': 'string',
                'format': 'datetime',},
            'number': {
                'type': 'number',
                'default': 2,},
        },
        'required': [
            'some_id',
            'name',
        ],
    })
    return this.success('all done')
Create a Schema with a Wrapper
You can create and also update a schema dynamically using the validate wrapper. Setting the wrapper's parameter mode to learn,
allows you to generate a json schema from the input_value or output_value of an Execution. For more information on this, refer to validate.
Validating Data with a Schema Resource
You can validate your data with the schema's method validate(data=<my_data>).
import flow_api

def handler(system: flow_api.System, this: flow_api.Execution, inputs: dict):
    my_data = {
        'some_id': '12345678-1abc-2cde-3def-987654321cba',
        'name': 'giraffe',
        'date': '2020-12-24 20:20',
        'additional': 'additional value',
    }

    validated_data = system.schema('my schema').validate(data=my_data)

    return this.success('all done')
Validate a Schema with a Wrapper
You can validate the input_value or output_value of an Execution using the validate wrapper. For more information on this,
refer to validate.
Coercing Data with a Schema Resource
If you want to coerce data, either convert compatible types or add default values for missing keys,
then use validate(data=<my_data>, coerce=True) or its alias coerce(data=<my_data>).
import flow_api

def handler(system: flow_api.System, this: flow_api.Execution, inputs: dict):
    my_data = {
        'name': '9999',
        'some_id': '12345678-1abc-2cde-3def-987654321cba',
    }

    coerced_data = system.schema('my schema').coerce(data=my_data)
    coerced_data = system.schema('my schema').validate(data=my_data, coerce=True)

    return this.success('all done')
Handling Validation Errors
If a schema validation or coersion fails the exception flow_api.exceptions.SchemaValidationError is thrown.
You have to catch the error and can decide what to do with the situation.
Either, you add further processing, stop execution of the flow or simply output a warning and ignore the failed validation.
In this example, the flow's input-data is validated and the error is written to the log:
import flow_api

def handler(system: flow_api.System, this: flow_api.Execution, inputs: dict):
    try:
        validated_data = system.schema('my schema').validate(data=inputs)
    except flow_api.exceptions.SchemaValidationError as ex:
        this.log(validation_error=repr(ex))

    # here follows further code

    return this.success('all done')
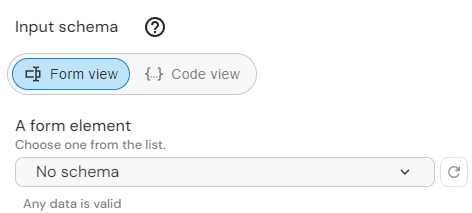
Input and Output Schema
You can directly define a schema for the input and output value of certain resources (e.g. flows) in a designated field. Upon execution, the actual input value is validated against the schema.
The below picture shows a flow where the input and output schema is defined. Every time the flow runs, the schema of its input value is validated by
the defined schema. The schema below expects a key in the input value that's called my_value and its value is of type integer.
On the left side you see the schema definition, either in code view or form view. On the right side, you see the resulting schema, also in code or form view. You can interact with this preview schema to see if it works like you intend.
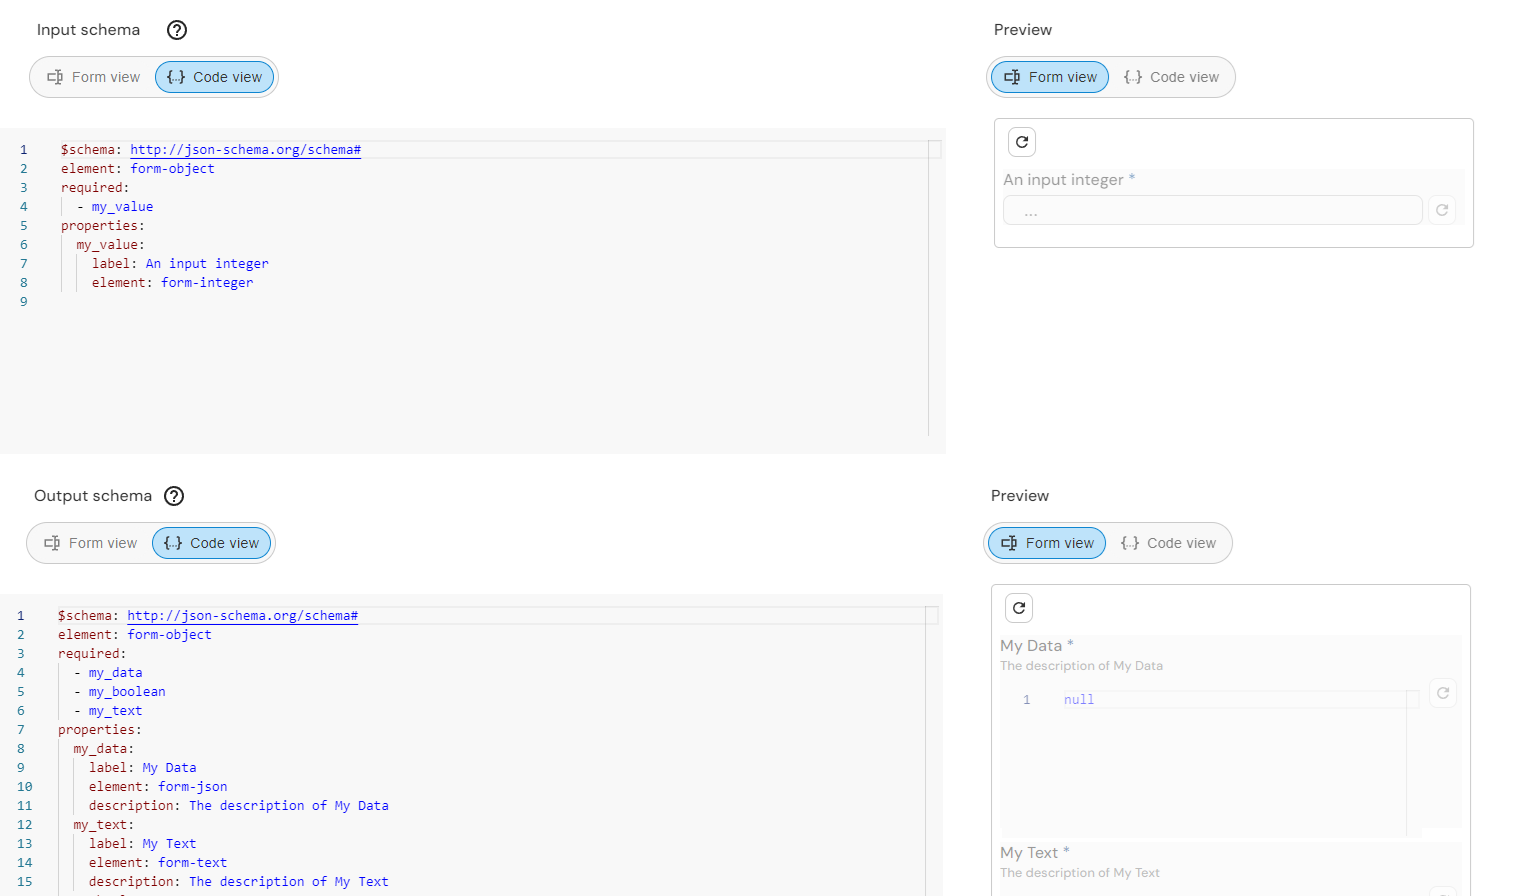
The input schema and output schema fields of a flow
For example the below script sets an output value of the execution that conforms to the schema.
import flow_api

def handler(system: flow_api.System, this: flow_api.Execution, inputs: dict):
    this.save(output_value={
        'my_data': [21,22,23,24],
        'my_boolean': True,
        'my_text': '''This text
spans across
multiple lines
'''
    })

    return this.success('all done')
Validation of Input Value
When executing a resource that has its input schema defined the input values of the resource are validated against the schema. Should the validation fail, the execution of the resource fails.

E.g. if "my_value" is not in the input values the execution fails
Formatting of Output Value
When executing a resource that has its output schema defined the output values of the resource can be displayed in a form. You can switch between the code view and the form view.
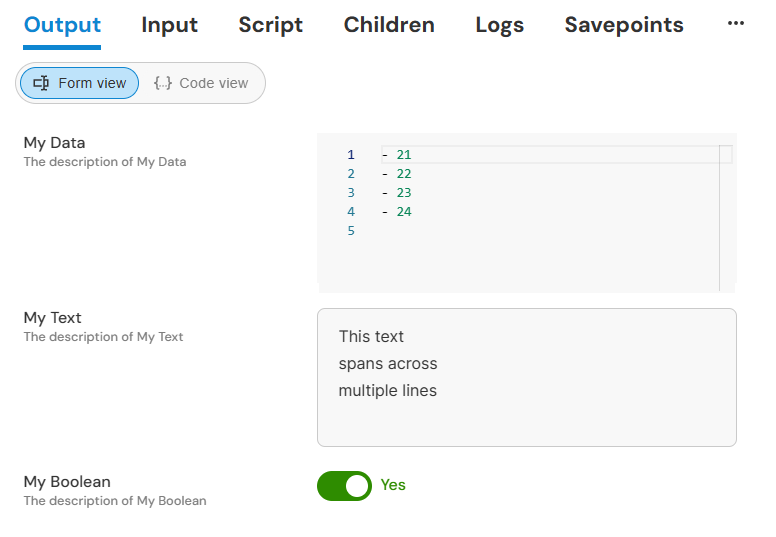
The form view
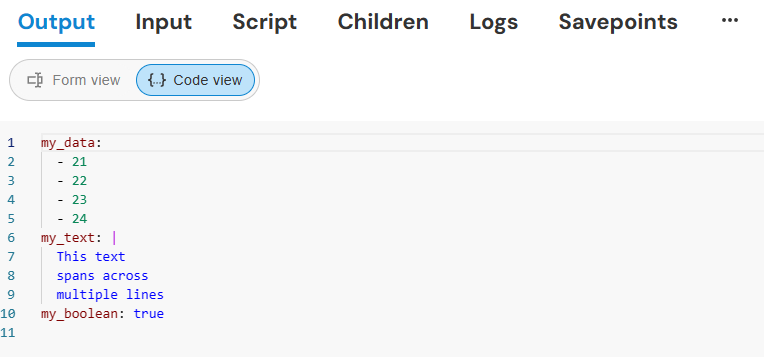
The code view
Input Schema of Wrappers
You can directly define a schema for the input value of wrappers. Besides validating the input value upon execution, this also serves as a way to generate a form for configuring the wrapper.
If you have the wrapper bundle installed you might be already familiar with configuring static wrappers with a form. The input schema of all wrappers in the bundle are defined, therefore they can be configured using a form.
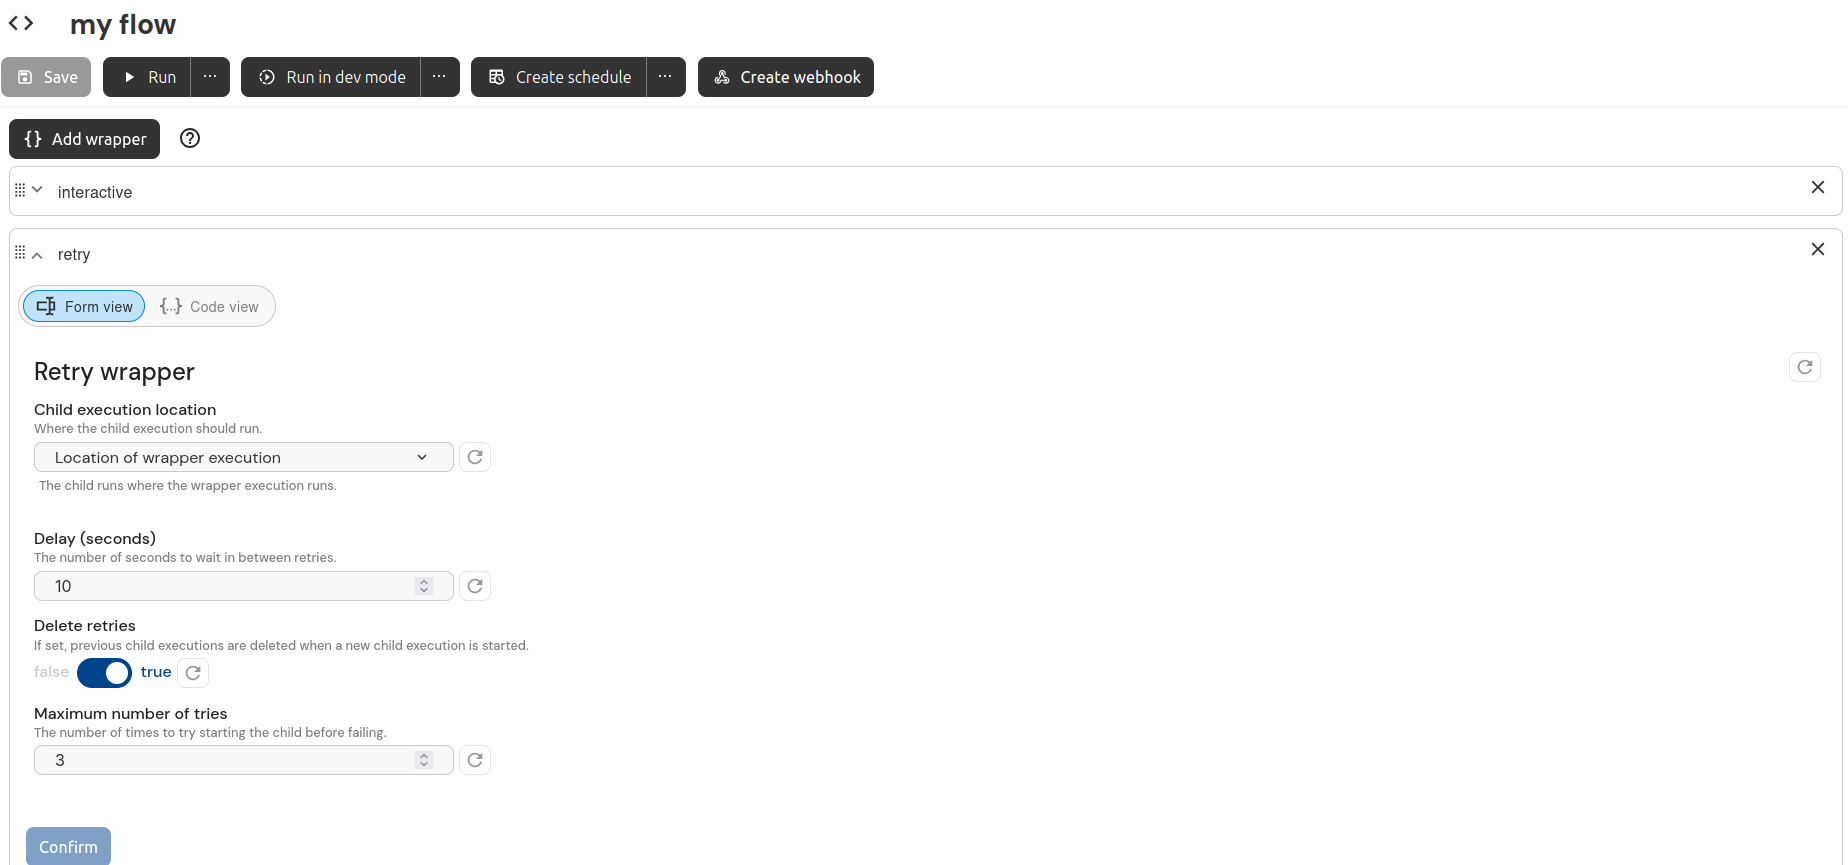
The configuration form of the retry wrapper
The input schema of the retry wrapper.
type: object
label: Retry wrapper
element: form-object
required:
  - max_tries
  - delay_sec
  - timeout_sec
  - delete_retries
properties:
  delay_sec:
    type: integer
    label: Delay (seconds)
    default: 10
    element: form-integer
    description: The number of seconds to wait in between retries.
  max_tries:
    type: integer
    label: Maximum number of tries
    default: 3
    element: form-integer
    description: The number of times to try starting the child before failing.
  timeout_sec:
    type: integer
    label: Timeout (seconds)
    default: 0
    element: form-integer
    description: >-
      Fail, if the child did not succeed within the timeout. Set to 0 to
      disable.
  delete_retries:
    type: boolean
    label: Delete retries
    default: true
    element: form-boolean
    description: >-
      If set, previous child executions are deleted when a new child execution
      is started.
description: ''
additionalProperties: false
Creating Input and Output Schemas
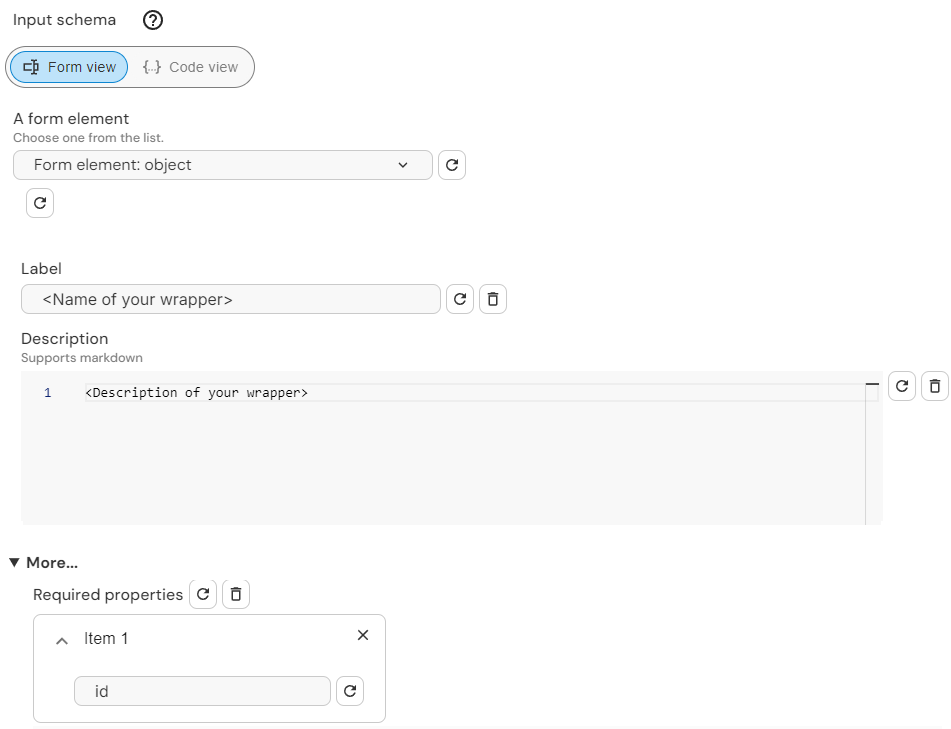
Let's have a look at how you can create your own input and output schemas. This example will show the creation of an input schema for a wrapper that enables its configuration with a form.
You can create schemas in one of two ways. You can use the form view and create the schema by clicking through elements and filling out fields, or you can use the code view and write the schema from scratch on your own. For either of those ways, it is important to understand what parts a schema consists of.
Let's categorize the building blocks of a schema into two parts. 1. Form data (i.e. title, description, etc.) 2. Input fields (the actual configuration values that affect behaviour of the wrapper).
Form data
type- is alwaysobjectlabel- a string that is the title of the formelement- is alwaysform-objectrequired- a list of form elements (listed inproperties) that are mandatory fieldsdescription- a string that is shown below thelabelpatternProperties- a json object that allow properties that are not defined inpropertiesbut match the regex and type defined hereadditionalProperties- a boolean that controls if properties not defined in the schema or inpatternPropertiesare allowed
Here's how you could start a schema for your own wrapper:
Code View:
type: object
label: <Name of your wrapper>
element: form-object
required:
  - id
description: <Description of your wrapper>
additionalProperties: false
Form View:
- Start with the empty form
- Select the form element
object, fill out the fieldslabelanddescriptionand set therequiredfields
Input fields
properties- a list contains the elements that will be shown in the configuration form
Each property defines how a field is displayed (simple input field, dropdown, toggle, etc.) what its default value is and what data-type it is.
A property can have the following attributes:
label- a string that is the title of the propertyelement- defines how the value for the property is set. It can be:form-string(single line text)form-text(multiline text)form-password(single line text that is displayed as *)form-integer(takes only integers)form-array(for adding and removing elements to a list)form-dropdown(for choosing a single value from a predefined list)form-boolean(toggle button)form-json(for json formatted value)form-const-string(a static string that cannot be changed)form-const-integer(a static integer that cannot be changed)form-const-null(a static null that cannot be changed)form-const-boolean(a static boolean that cannot be changed)form-object(for nesting another form within the form)
- (optional)
description- a string that is shown below thelabel - (optional)
default- the default value - (for use with constants)
const- the constant value of the element - (for
form-arrayonly)items- defines the attributes likeelement,type, etc. of the items - (for
form-dropdownonly)defaultIndex- defines which dropdown item is the default value - (for
form-dropdownonly)anyOf- a list of properties with constant elements
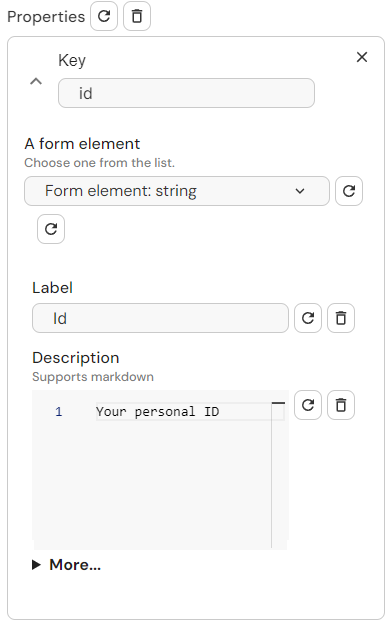
Here's how your input schema could look like, now containing the properties. Each element type is represented so you can see how to
make them work:
Code View:
# as seen in the previous example
type: object
label: Reporting wrapper
element: form-object
required:
  - id
# here come the properties
properties:
  id:
    label: Id
    element: form-string
    description: Your personal ID
  report:
    label: Report
    element: form-text
    description: Enter your report
  password:
    label: Password
    element: form-password
  team_no:
    label: Team Number
    element: form-integer
  send_report_to:
    element: form-array
    type: array
    label: Report Recipient list
    default: []
    items:
      element: form-string
      label: Recipient
  version:
    anyOf:
      - const: v1
        label: Version 1
        element: form-const-string
      - const: v2
        label: Version 2
        element: form-const-string
    label: Version
    element: form-dropdown
    defaultIndex: 0
  escalate:
    label: Escalate
    element: form-boolean
    default: false
  logs:
    label: Logs
    element: form-json
description: Enter configuration information
additionalProperties: false
Form View:
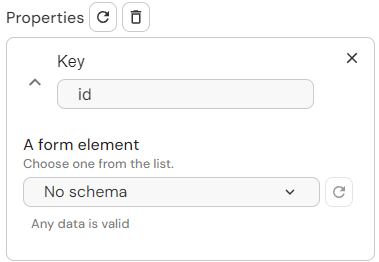
- Initially, there are no properties.

- Click on add properties and type in the property name. In this example we are going to do one property only:
id

- Now you will need to choose the form element for this property
- Choose the form element
stringand fill out the fieldslabelanddescription
- Repeat with the other properties
Result:
This schema produces the following form that helps with the configuration:
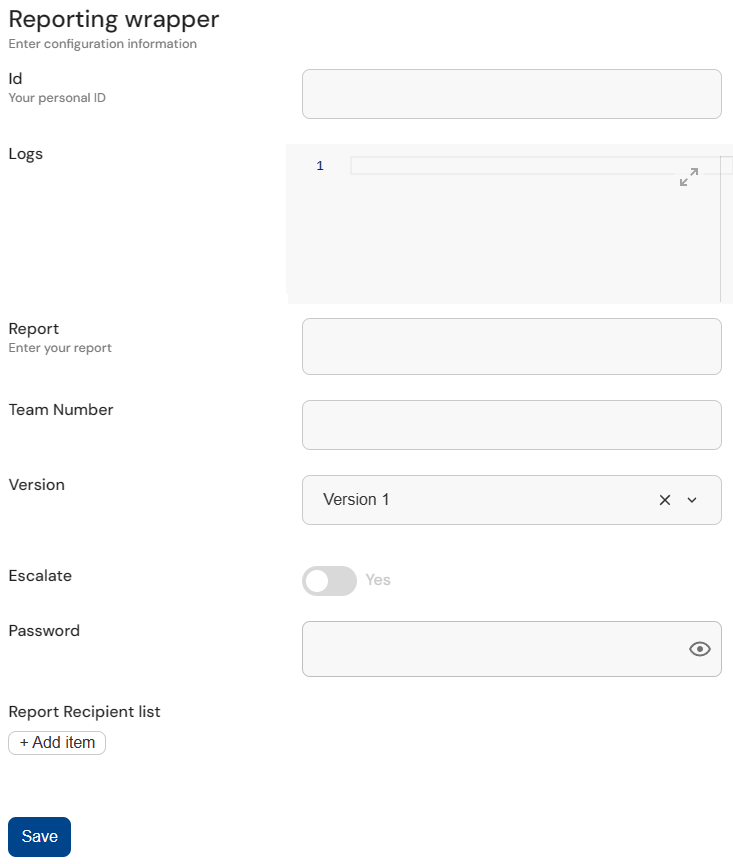
The configuration form that results from the schema
Defining patternProperties and patternProperties
With patternProperties and additionalProperties you can enable the user to supply inputs (or outputs) that are not defined in properties. Let's take the input schema of a flow called my-flow as an illustration.
If patternProperties is not set, additionalProperties is not enabled, and there is nothing defined in properties, my-flow will not take any inputs.
A schema with no predefined properties, no additionalProperties and no patternProperties.
type: object
label: <Name of your flow>
element: form-object
required: []
description: <Description of your flow>
additionalProperties: false
properties: {}
Now let's run this flow and pass an input value:
import flow_api

def handler(system: flow_api.System, this: flow_api.Execution, inputs: dict):
    this.flow(
        'my-flow',
        my_int=42,
    )
    return this.success('all done')
As expected, it fails to validate against the input schema.
Input validation failed: "Additional properties are not allowed ('my_int' was unexpected)"
If additionalProperties is set to True, the user can supply any property without restrictions.
A schema with no predefined properties but additionalProperties enabled.
type: object
label: <Name of your flow>
element: form-object
required: []
description: <Description of your flow>
additionalProperties: true
properties: {}
This schema considers any property as valid input. If you run the flow with the same input value, it succeeds.
If patternProperties is set and additionalProperties is False the user can only supply properties that match the type and regex defined in patternProperties.
A schema with no predefined properties, no additionalProperties but patternProperties defined so any input that matches the regex ^my_prefix.* and is of type string is accepted.
type: object
label: <Name of your flow>
element: form-object
required: []
description: <Description of your flow>
additionalProperties: false
patternProperties:
  ^my_prefix.*:
    element: form-string
    type: string
    default: null
properties: {}
If we run this flow and pass the same input value, it will fail, since my_int does not validate against the regex:
import flow_api

def handler(system: flow_api.System, this: flow_api.Execution, inputs: dict):
    this.flow(
        'my-flow',
        my_int=42,
    )
    return this.success('all done')
Input validation failed: "'my_int' does not match any of the regexes: '^my_prefix.*'"
Similarly, if the name of the input value is right, but the type is not, it still fails:
import flow_api

def handler(system: flow_api.System, this: flow_api.Execution, inputs: dict):
    this.flow(
        'my-flow',
        my_prefix_1=42,
    )
    return this.success('all done')
Input validation failed: "42 is not of type 'string'"
Only when it mathces the regex and the type, the input validation succeeds:
import flow_api

def handler(system: flow_api.System, this: flow_api.Execution, inputs: dict):
    this.flow(
        'my-flow',
        my_prefix_1='my_string',
    )
    return this.success('all done')
Protected Fields
You can hide sensitive information in the input and output value of executions by making sure that they are in a form-password element in the input/output schema.
This ensures, that whenever the execution is opened in the UI, sensitive fields of the input/output value are obfuscated.
The authentication.password field of the input schema of the REST connector is defined as a protected field.
Let's see what happens if you run the following flow script:
this.connect(
      'httpbingo rest connector',
      name='httpbingo connection',
      authentication= {
          'authentication_method_name': 'basic',
          'username': 'user',
          'password': 'pass',
      },
  )
Navigating to the connection execution and looking at the input values only shows the obfuscated value.
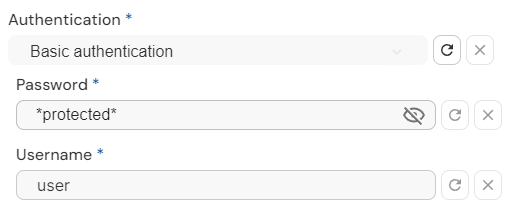
The sensitive information is obfuscated in the form view...
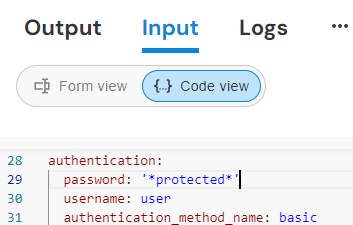
...and in the code view too.
Protected fields only obfuscate values in the UI. It is possible to read the actual value of protected fields via the flow_api.
See RBAC for restricting access to executing flow_api commands.