Connectors
About
Connectors are an Engine resources that allow your flow scripts to interact with the outside world - anything and everything outside of the Engine platform. Whenever you want to issue a command to a program, run a script on a remote system, or query a database - all that is performed through connectors.
There are different connector types, each for a particular type of endpoint / protocol.
Connectors are called through the Engine function this.connect(). Each call creates a separate execution of type "connection", with its own inputs and outputs.
Connectors enable outbound communication from Engine. If you want to call Engine from a third party system you can do so with a webhook.
Can't see the video? Watch it on YouTube
Can't see the video? Watch it on YouTube
Usage
There are two ways you can go about using a connector.
The first is to create a connector resource, configure it, and use it in your flow scripts. This is useful if most parameters of your connector are static (e.g. host and port of a database).
The second is to define the connector in your flow script on the fly. This makes sense if the connector parameters change all the time or you're simply testing a connection and you just want to create a disposable connector that you don't intend to reuse.
Creating and using a connector resource
Click on '+ Create' -> 'Connector' -> 'OPENAI'. Call it "my_openai_connector". You can configure the connector attributes in a form or in YAML format. For configuring using the YAML format switch to 'Code view'.
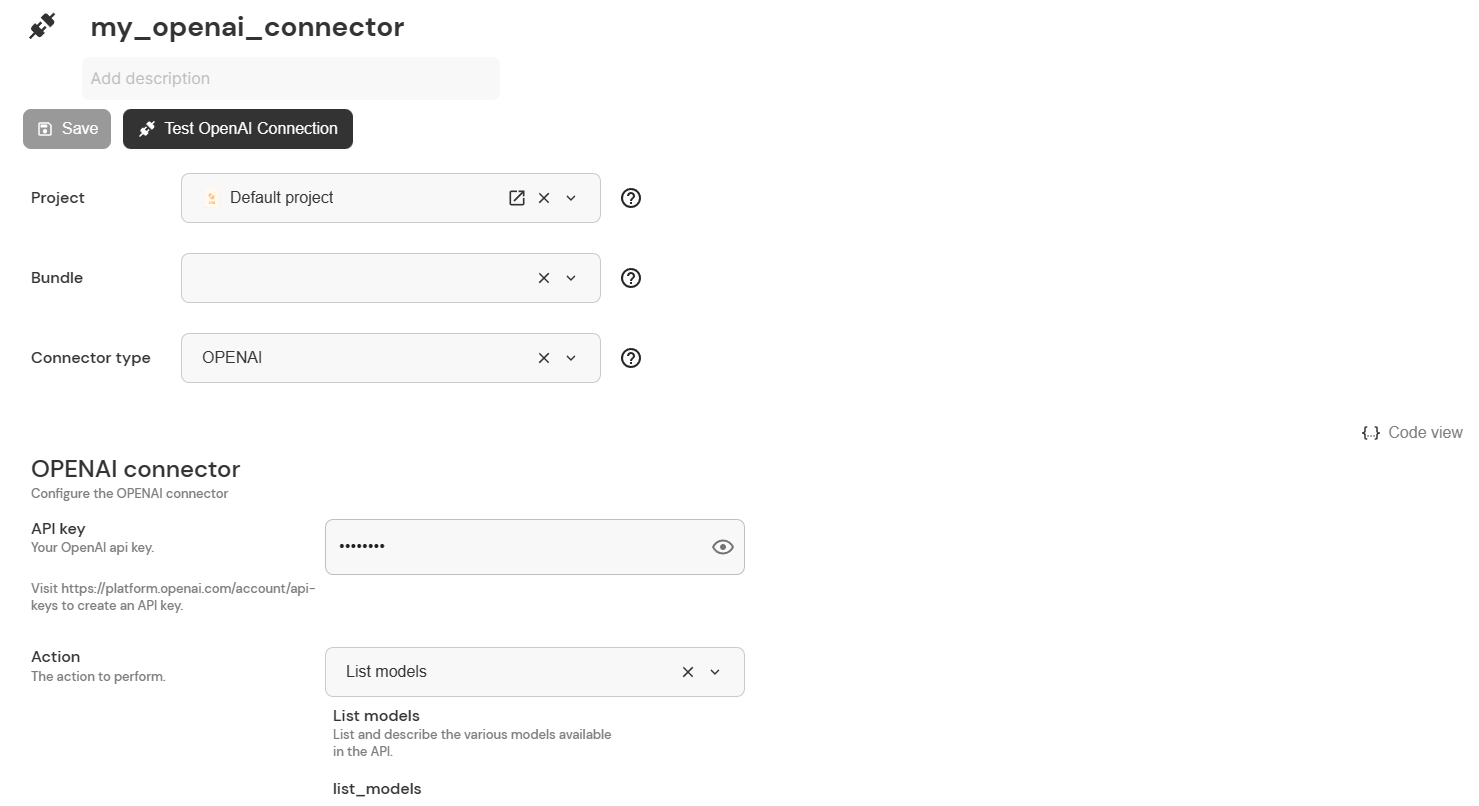
The form for configuring a connector
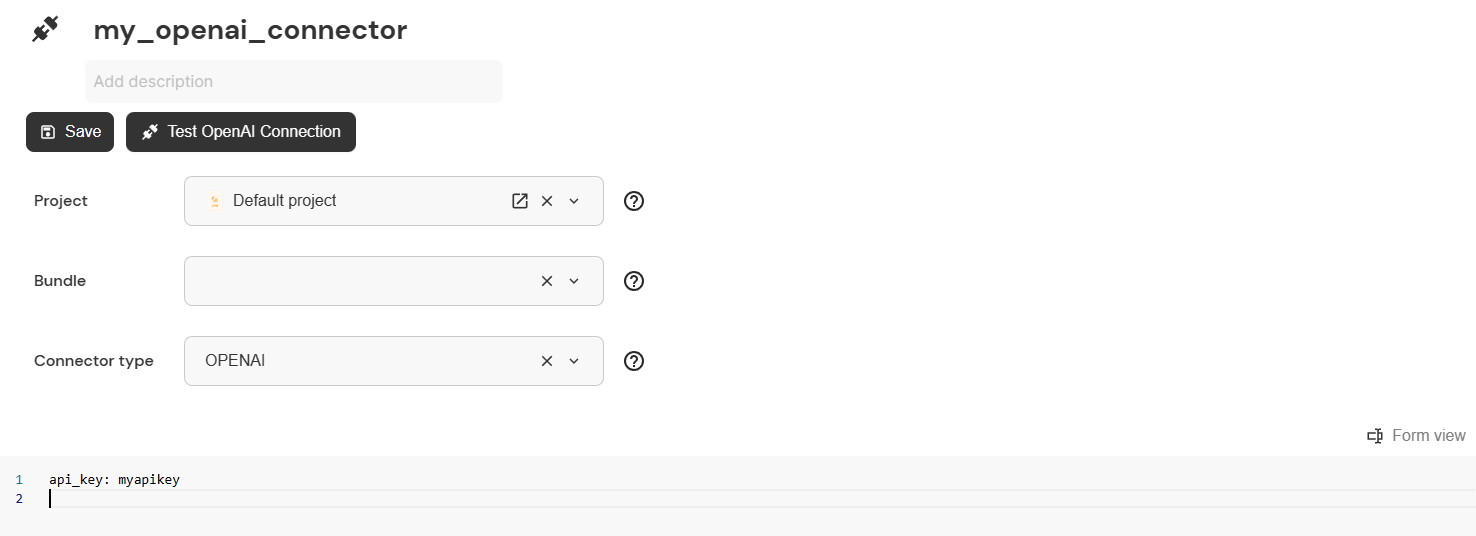
The code view for configuring a connector
The configuration must be a valid YAML document: yaml.org/spec It is also possible to enter a JSON config, since YAML is a superset of JSON. Invalid lines in the configuration (e.g. lines beginning with #) are discarded.
Here's how you can use this newly created and configured connector in a flow script. Note that the first parameter of this.connect() is the name of the connector.
import flow_api
def handler(system: flow_api.System, this: flow_api.Execution, inputs: dict):
    models = this.connect('my_openai_connector').get('output_value')
    this.log(models)
    return this.success('all done')
Overriding inputs
You can override inputs which are stored in the connector by specifying different values when using the connector. Let's modify the flow script from before to use a different API key.
import flow_api
def handler(system: flow_api.System, this: flow_api.Execution, inputs: dict):
    models = this.connect('my_openai_connector', api_key='anotherapikey').get('output_value')
    this.log(models)
    return this.success('all done')
When you override a key in the input value that is a YAML object (or Python dictionary), the old value will be merged (and not replaced) with the new value. This can result in an invalid configuration.
-
Overriding a key that is not an object. This works fine:
# connector config of `my_connector`my_key: 1# flow scriptthis.connect('my_connector', my_key=2)# resulting config of the connection executionmy_key: 2 -
Overriding a key that is an object. This results in a merged object, that leads to an error, since the connector does not expect the
temp_pathkey with the mode_namerun_commands.# connector config of `my_connector`mode:mode_name: execute_scripttemp_path: /tmp# flow scriptthis.connect('my_connector', mode={'mode_name': 'run_commands','script': 'uptime',})# resulting config of the connection executionmode:mode_name: run_commandstemp_path: /tmpscript: uptime
To avoid this, only define keys in a connector that are valid accross all modes that you will use, and define the rest in the flow script. You can also create multiple connectors for different modes, and use the appropriate connector in the flow script.
Defining connectors within flow scripts
If you don't want to use a connector resource, you can define the connector parameters in the flow script. Note, that you need to specify connector_type as well (if an existing connector resource is used, this parameter is already supplied).
import flow_api
def handler(system: flow_api.System, this: flow_api.Execution, inputs: dict):
    connector_inputs = {
        **flow_api.split_url('https://httpbingo.org/post'),
        'mode': {
            'mode_name': 'post',
            'body': {'body_mode': 'text', 'text': 'payload'},
        },
    }
    child_execution = this.connect(
        connector_type='REST',
        name='post to httpbingo',
        **connector_inputs,
        run=False,
    )
    child_execution.run_async()
    # do other stuff
    child_execution.wait()
    outputs = child_execution.get('output_value')
    this.log(outputs)
    return this.success('all done')
See Building a REST request below for how the REST connector's structured input (URL, method, body, headers) fits together.
Building a REST request
The REST connector takes a structured input rather than a single URL string. Its main parts are:
- URL — split into
scheme,host,pathand an optionalquery. Rather than assembling these by hand, pass a full URL throughflow_api.split_url('https://…'), which returns thescheme,host,pathandquery(and, when present, theportand HTTP-basic credentials) ready to spread into the call. - Method and body — chosen with
mode.mode.mode_nameis one ofget,post,put,patch,delete,optionsorhead. For a request that sends a body, put the body undermode.bodyand pick abody_mode:text— a plain-text body (Content-Type: text/plain).json— a JSON body (Content-Type: application/json).urlencoded— a form body (Content-Type: application/x-www-form-urlencoded); this is the shape OAuth2 token endpoints expect.multipart— a multipart body.
- Headers and query — given as arrays of
{name, value}pairs (underheadersandquery).flow_api.split_url(...)already produces thequeryarray from a URL's query string.
The example below calls an OAuth2-protected API in two steps: mint a token from the token endpoint with a form-urlencoded body, then call the API with the token as a bearer header.
import flow_api

def handler(system: flow_api.System, this: flow_api.Execution, inputs: dict):
    tenant_id = '...'
    client_id = '...'
    client_secret = '...'

    # 1) OAuth2 client-credentials token — urlencoded body
    token = this.connect(
        connector_type='REST',
        name='get graph token',
        **flow_api.split_url(f'https://login.microsoftonline.com/{tenant_id}/oauth2/v2.0/token'),
        mode={
            'mode_name': 'post',
            'body': {
                'body_mode': 'urlencoded',
                'urlencoded': {
                    'grant_type': 'client_credentials',
                    'client_id': client_id,
                    'client_secret': client_secret,
                    'scope': 'https://graph.microsoft.com/.default',
                },
            },
        },
    ).get('output_value')
    access_token = token['json']['access_token']

    # 2) Call the API — GET with a bearer header and a query parameter
    users = this.connect(
        connector_type='REST',
        name='list users',
        **flow_api.split_url('https://graph.microsoft.com/v1.0/users?$select=id,displayName'),
        headers=[{'name': 'Authorization', 'value': f'Bearer {access_token}'}],
        mode={'mode_name': 'get'},
    ).get('output_value')

    this.log(user_count=len(users['json']['value']))
    return this.success('all done')
For OAuth2-protected APIs the REST connector can also mint and attach the token for you with its built-in oauth_grant authentication method — see OAuth2 (token grant). Minting the token by hand (as above) is useful when a provider needs a custom token request, or when you want the raw token response.
The explicit, canonical form of a request body is mode.body with a body_mode such as text, json, urlencoded or multipart (see above); prefer it in new flows. The connector also accepts the python-requests-style data= and json= keywords and translates them into the matching mode.body, emitting a deprecation notice: a data= mapping becomes a urlencoded body, a data= string becomes a text body, data= bytes become a base64 binary_data body, and json= becomes a json body. Headers and query parameters are arrays of {name, value} pairs, and the URL is scheme/host/path — the simplest way to produce all of these is flow_api.split_url(...).
Attach Vault Secrets
To be able to attach secrets to a connector, a working vault integration must be configured beforehand.
Please refer to Vault Integration for details.
Order of Input Application
Inputs for a connection execution can be specified in different places. Inputs from all places are merged into one combined input set before being used by the connector. Inputs are applied in the following order:
- Value of the connector
- Vault secrets associated with the connector
- Inputs specified in the flow script
Inputs which are applied later can override keys of inputs which were applied before. If, for example, the connector specifies a key port and the vault secret also contains a key port, the value of the vault secret will be used.
Authenticating REST requests
The REST connector attaches credentials to a request through its authentication input, which selects an authentication method:
- None — send the request unauthenticated.
- Bearer token — send a static
Authorization: Bearer <token>header. - Username / password (HTTP Basic) — send HTTP Basic credentials.
- Secret headers — send one or more credential headers you define.
- OAuth2 (token grant) — mint an OAuth2 access token from a token endpoint and send it as an
Authorization: Bearerheader (see below).
OAuth2 (token grant)
OAuth2 is the dominant authorization scheme for modern SaaS APIs — Google, Microsoft Graph, Salesforce, GitHub, Slack and many others. The oauth_grant authentication method mints an OAuth2 access token engine-side and injects it as an Authorization: Bearer <token> header on the request, so a flow accesses an OAuth2-protected API without hand-rolling the token exchange.
The token is fetched per request by POSTing the configured grant to the token_url. The minted access token and the client secret are kept out of the execution log. Requests to the token endpoint honour any HTTP_PROXY/HTTPS_PROXY set on the container (see Using a proxy).
Supported grants
client_credentials— authenticate as the OAuth2 client itself (machine-to-machine).refresh_token— exchange a long-lived refresh token (obtained once through a consent flow) for a fresh access token on each request.jwt_bearer— sign a JWT assertion with a private key and exchange it for an access token (RFC 7523). This is the server-to-server / service-account flow — for example a Google service account — that needs no human consent step. The assertion is signed engine-side and the private key is kept out of the execution log.
Fields (under authentication)
| Field | Description |
|---|---|
authentication_method | oauth_grant. |
token_url | The OAuth2 token endpoint that mints the access token, e.g. https://oauth2.googleapis.com/token. |
grant.grant_mode | client_credentials, refresh_token or jwt_bearer. |
grant.client_id | For the client_credentials / refresh_token grants: the OAuth2 client ID registered with the provider. |
grant.client_secret | For the client_credentials / refresh_token grants: the OAuth2 client secret — a secret field. Leave empty for a public client. |
grant.refresh_token | For the refresh_token grant: the refresh token to exchange — a secret field. |
grant.scope | Optional space-separated scopes to request, e.g. https://www.googleapis.com/auth/drive.readonly. Leave empty to use the provider default. |
grant.issuer | For the jwt_bearer grant: the JWT issuer (iss) claim — the identity the assertion is signed on behalf of. For a Google service account this is the service-account email (...@...iam.gserviceaccount.com). |
grant.subject | For the jwt_bearer grant: optional JWT subject (sub) claim. Leave empty to default to the issuer. Set it to impersonate another principal — e.g. the user email for Google domain-wide delegation. |
grant.audience | For the jwt_bearer grant: optional JWT audience (aud) claim. Leave empty to default to the token_url (correct for Google and most providers). |
grant.private_key | For the jwt_bearer grant: the PEM-encoded RSA or EC private key used to sign the assertion — a secret field. For a Google service account this is the private_key field of its JSON key file. |
grant.signing_algorithm | For the jwt_bearer grant: optional JWS algorithm — one of RS256 (default), RS384, RS512 (RSA keys) or ES256, ES384, ES512 (EC keys). Google service accounts use RS256. |
grant.key_id | For the jwt_bearer grant: optional key identifier written to the JWT header kid. For a Google service account this is the private_key_id field of its JSON key file. |
grant.assertion_lifetime | For the jwt_bearer grant: optional assertion validity in seconds (the gap between the iat and exp claims). Defaults to 3600. Providers cap this — Google rejects assertions valid for more than one hour. |
client_auth_method.method | Optional. body (default) sends client_id/client_secret in the token-request body; basic sends them as an HTTP Basic header on the token request, which some providers require. |
Example — connector resource (refresh-token grant against Google)
Keep the credentials in Vault and reference them with vault.secret(...) templating (see Vault Integration), so no secret is written into the connector value:
url: https://www.googleapis.com/drive/v3/files
method: GET
authentication:
  authentication_method: oauth_grant
  token_url: https://oauth2.googleapis.com/token
  grant:
    grant_mode: refresh_token
    client_id: "{{ vault.secret('generated-secrets:my-google-app.client_id') }}"
    client_secret: "{{ vault.secret('generated-secrets:my-google-app.client_secret') }}"
    refresh_token: "{{ vault.secret('generated-secrets:my-google-app.refresh_token') }}"
    scope: https://www.googleapis.com/auth/drive.readonly
  client_auth_method:
    method: body
Example — client-credentials grant defined in a flow
import flow_api
def handler(system: flow_api.System, this: flow_api.Execution, inputs: dict):
    result = this.connect(
        connector_type='REST',
        name='call API with OAuth2 client-credentials',
        **flow_api.split_url('https://api.example.com/v1/things'),
        mode={'mode_name': 'get'},
        authentication={
            'authentication_method': 'oauth_grant',
            'token_url': 'https://login.example.com/oauth2/token',
            'grant': {
                'grant_mode': 'client_credentials',
                'client_id': "{{ vault.secret('generated-secrets:my-app.client_id') }}",
                'client_secret': "{{ vault.secret('generated-secrets:my-app.client_secret') }}",
                'scope': 'things.read',
            },
        },
    )
    this.log(result.get('output_value'))
    return this.success('all done')
Example — JWT-bearer grant against a Google service account
The jwt_bearer grant signs a JWT with the service account's private key and exchanges it for an access token, so a server-to-server integration authenticates without a human consent step. Take issuer, private_key and key_id from the fields of the service account's JSON key file, and keep the private key in Vault:
url: https://www.googleapis.com/drive/v3/files
method: GET
authentication:
  authentication_method: oauth_grant
  token_url: https://oauth2.googleapis.com/token
  grant:
    grant_mode: jwt_bearer
    issuer: my-service-account@my-project.iam.gserviceaccount.com
    private_key: "{{ vault.secret('generated-secrets:my-google-sa.private_key') }}"
    key_id: "{{ vault.secret('generated-secrets:my-google-sa.private_key_id') }}"
    signing_algorithm: RS256
    scope: https://www.googleapis.com/auth/drive.readonly
  client_auth_method:
    method: body
To impersonate a user through Google domain-wide delegation, set subject to the user's email in addition to the fields above.
When the token endpoint returns a non-200 response, or a 200 response without an access_token, the connection fails with a descriptive error (the provider's error body is surfaced, truncated, without leaking the credentials).
Using a proxy
If the Engine cannot reach an endpoint directly — for example when outbound traffic must pass through a corporate forward proxy — connectors can route their requests through an HTTP proxy. There are two ways to configure this, and they can be combined.
1. Container-wide proxy (environment variables)
Setting the standard proxy environment variables on the workspace container applies to all HTTP-based connectors at once, with no per-connection configuration:
HTTP_PROXY/HTTPS_PROXY— the proxy to use forhttp:///https://requests.NO_PROXY— a comma-separated list of hosts/domains that should bypass the proxy (e.g.localhost,127.0.0.1,.internal.example.com).WS_PROXY/WSS_PROXY— the proxy forws:///wss://(web-socket) requests.
These are honoured by the HTTP-based connector types (REST, SOAP, WEBDAV, VAULT, AWS, AZURE, AZUREAI, OPENAI, GOOGLE, K8S, OVH, PS), because their underlying HTTP libraries read the proxy settings from the container environment. Configure them like any other workspace setting — see Workspace Configuration.
2. Per-connection proxy (proxy input)
The REST, SOAP and WEBDAV connectors additionally accept a proxy input on a single connection, so one connector can use a proxy (or a different proxy) without changing the whole container:
result = this.connect(
    connector_type='REST',
    name='call API through proxy',
    scheme='https',
    host='api.example.com',
    path='/v1/things',
    mode={'mode_name': 'get'},
    proxy={
        'proxy_url': 'http://my-proxy:8080',
        'proxy_user': 'alice',          # optional
        'proxy_password': 'secret',     # optional, masked on read
    },
)
proxy_urlis required;proxy_userandproxy_passwordare optional.proxy_passwordis a secret field, so it is masked on read like any other credential.- An explicit
proxyinput overrides the container proxy environment variables for that connection. When noproxyinput is set, the container-wide proxy (if any) still applies. - The proxy target is written to the connection log with any embedded credentials stripped, so the proxy password is never leaked into logs.
- For
SOAP, a malformed proxy configuration is reported as anInvalidInputError(invalid proxy configuration: …) rather than an opaque internal error.
Proxy support currently covers the HTTP-based connectors. The non-HTTP connectors (SMTP, IMAP, FTP, the SQL/database and SSH/SCP connectors) do not yet route through a proxy.
Analysing and testing connections
You can extend the functionality of your connectors by downloading the freely available Connection Analysis & Test bundle. With this bundle you can, for example, get the schema of a database or test the connection to an FTP server by simply clicking on a button in the UI of your connector.
Testing configuration records
Some workspace-level configuration records expose a built-in connectivity test — no bundle required. Open the record in the Console and click Test connection to verify that its endpoint and credentials are valid right now. This is available for:
- Vault configuration (
vault_config) — checks that the workspace can authenticate against the configured Vault server (see Vault Integration). - LDAP configuration (
ldap_config) — checks the bind/login against the directory server. - Devolutions configuration (
devolutions_config) — checks authentication against the Devolutions server.
The test performs a live login/handshake and reports whether it succeeded without ever returning the stored secret. It is read-only: it makes an outbound authentication request but changes no workspace state. Use it to confirm a configuration is healthy — for example, immediately after rotating a Vault password — instead of waiting for downstream operations to fail with authentication errors.
Secret fields are masked on read
Connector value fields that a connector type declares secret in its input
schema (password, token, secret-text and similar) are masked when the
connector record is read through an external interface — the REST API, the MCP
tools, and the Console UI. Instead of the stored value you get a placeholder, so
credentials embedded directly in a connector's value are not exposed by a plain
read, an export, or a list view.
- Masking affects reads only — the value is still stored, so the connector keeps working. Internal consumers that genuinely need the credential (the execution engine running the connection, and git-sync) read it unmasked.
- Editing such a record is safe: submitting it back with the placeholder still in place preserves the stored secret instead of overwriting it with the mask. Send a new value only when you intend to change the secret.
- To avoid storing a credential in the connector at all, attach it from Vault (see Attach Vault Secrets) or wrap it with inline secrets.